32-bit password

Hi all,

I’m not clear the topic 32-bit password .

I want to know how many characters or how many digits I should write in a password for my xNT implant.

If someone can explain the subject, please?

Hey @Fabian

1 character can be distinguished by 8 bits (for example the first 256 characters in the ASCII table.) Since the password is 32 bits you can select four letters or numbers, or even some symbols as your password for the xNT. When I tested it, I was only able to enter two characters when I used symbols like “π”. I’m not sure how the translation scheme works. The app won’t allow you to enter an invalid password, so you shouldn’t have to worry too much about it.

Just as a note, this password only protects your tag from being accidentally corrupted or maliciously formatted as read only. You will still be able to write NDEF records (ex: URL or telephone number) to the tag without the password.

Hi all,

I want to set a password only to the memory section of the xNT implant, that is from page 4h to the E1h,

Is it possible to do it?
What program do you recommend?

image

yes basically tagwriter or nfc tools will allow you to “password protect” your tag’s memory contents. This is done by setting the AUTH0 byte to 00 or 04 or whatever page you want. However, you cannot limit that protection to page E1… the AUTH0 byte works by applying password protection from the specified page DOWN… so from page 04 to E6 or page 00 to E6.

Besides, not protecting your configuration bytes in pages E3 through E6 is not advised anyway. This is for many reasons, but also the fact that your password block is page E5… so if you leave AUTH0 set to default which is FF, then nothing is protected, including your password, which means anyone can overwrite your password without first having to authenticate… so even though pages E5 and E6 cannot be read through normal read commands, anyone could simply overwrite the current password with whatever password they wanted and do bad things.

There is another bit flag called PROT which sets the type of password protection you want. Setting PROT bit to 0 means write protection, so pages protected via the AUTH0 setting will require password authentication before they can be written, but anyone could read them. Setting PROT to 1 means the pages are protected against reading as well as writing, so anyone who wants to read or write to those protected pages needs to authenticate first.

Also don’t forget the lock bytes in pages 02 and E2… if those are not disabled (by the Dangerous NFC app) then you could accidentally lock pages of your tag permanently as read-only, with no recovery option.

hanks for the AMAL information, my ideas were clarified, but some doubts arose …

First question:

Regarding the read-only block bytes, it means that I can store information on the implant (for example, personal data for a system of identification of people) and activate the blocking bytes so that nobody can modify this information (if a person requires modify your data you must acquire a new implant). Can not a hacker modify this information but can he read it?

Second question:

What happens if information is stored in the implant, a password is set with PROT = 1 (write and read protection) and the read-only block bytes are activated. Can a hacker no longer modify the information but to read it, first authenticate?

Third question:

If I set a password with the PROT bit at 1, and AUTH0 at 00 (protection for all memory blocks from 00 to E6). In an access control, will a reader request authentication before reading the UID of the implant and allowing access? Is it better to set AUTH0 in 04?

Fourth question:

What bytes are the ones that the Dangerous NFC application modifies, to disable the read-only block? What is the value of AUTH0? What value does AUTHLIM have? What value does PROT have?

Fifth question:
Pages E5 and E6 can not be read through normal reading commands, which commands allow me to read them or how do I know if I am reading those values. Is it possible to obtain the password of an implant?

Sixth question:

AUTHLIM limit the number of incorrect password entries. By default it is in 000 which is disabled, the number of attempts is from 1 to 7. This configuration is used to avoid brute force attacks, when the specified number of attempts is reached, the protected part of the memory is blocked. Can the information stored in the implant still be read or not?

Yes you could write data to memory pages and trip lock bytes to forever lock those memory pages as read-only with no way to undo that. Lock bytes and their function has no bearing on the readability of that data, it only makes those memory pages permanently unwritable.

Correct. The memory pages that are marked as locked by the bit values flipped from 0 to 1 in the relevant lock bytes will never be writable regardless of the PROT setting or password authentication. However, if PROT is 1 and the memory page in question is within the AUTH0 range, then it will not be readable until the NFC session is successfully authenticated. I feel it’s important to point out that the authentication process is not encrypted. The reader will send the 4 byte password in the clear to the chip, so it is by no means designed to be a “real” security mechanism. Furthermore, it is also possible to brute force this 4 byte password fairly quickly with the correct hardware and software. If you want actual security, check out our xDF2, flexDF, or flexDF2… or if you want to explore web API integrations with a crypto-secure device, check out the VivoKey Spark.

That depends entirely upon the access control system and how it functions. There is a 0% chance it will just work like that by default… in fact, most access control systems don’t care about the memory content in the chip at all and just rely on the UID, which is always reported regardless of memory page protection settings. This is because the UID is part of the ISO14443 selection process, so while a read command issued to read page 00 and 01 where the UID lives would fail if PROT=1 and AUTH0=00, the actual process tags go through to announce their presences in the field to the reader would include this UID serial number. The DESFire EV2 based products above include the ability to randomize this UID every time the chip is brought within a reader field (called ‘private mode’) and the chip can be configured to only reveal the real UID after authentication occurs… but all of these features must be actually used by the system you’re wanting to use it with, or they will be irrelevant.

The app explains exactly what it’s going to do right on the main screen. Check out the screenshots on the play store for Dangerous NFC. It modifies 02, E2, AUTH0=E2, PROT=0, AUTHLIM=0

They are unable to be read. No special commands can be used to read them. That is by design.

If AUTHLIM is reached, the data protected under AUTH0 is no longer accessible and there is no way to access it once AUTHLIM has been reached. It is a destructive process, so for implants, it’s best to leave it disabled. Again, if you want real security for your chip implant, explore using a DESFire EV1 or EV2 based product.

Amal I’m doing a thesis on the implant xNT, Applications, security and vulnerabilities, that’s why they are all my questions. :sonriendo:

Make the configuration with the application and verify the changes that are made

Page 02: 54 48 0F 00
Page 03: E1 12 6D 00
Page 04: 03 2E 92 05
Page 05: 01 77 36 2F


Page E2: 00 00 7F BD
Page E3: 04 00 00 E2
Page E4: 00 05 00 00

Could you help me understand why the read-only static and dynamic block bytes are configured that way? Are some pages blocked for read only?

How can I modify only the byte of AUTH0 so that the password is from page 04? Is the NFC Tools application for advanced commands useful? Attached image

image

I want to establish a scenario, in which the implant has information stored and protected with read and write password, in this scenario I want to obtain the password configured in my implant, read the information and duplicate it in a card or other implant. What tools do I need? do you advise to use?

Yes, page 02 and E2 are locked using this configuration… basically I’ve locked the lock bytes so no further lock byte changes can be made. I used their power against themselves :slight_smile:

You must write full memory pages, so you need to issue the write command A2 then the page E3 then the full page content, which if you want to go by defaults, should be 04 00 00 04. The first byte 04 is the CFG byte, followed by data mirroring configuration bytes (00 00) and then the final byte 04 is AUTH0… so the full command would be A2 E3 04 00 00 04

After you issue this command, then you will not be able to make any further changes to anything without first authenticating.

Issuing the above command will not change the PROT bit, so memory content will still be readable without first authenticating. You will definitely want to read the NTAG216 data sheet, which contains key info including commands and how to issue them to the chip. Also read other posts on the forum… you’ll see I recommend NFC Shell for this kind of work, because NFC Tools does not allow concurrent commands to be executed, and NFC Shell does.

Do your research, then post back here with what you think the access byte in page E4 should be set to in order to achieve your goals.

Amal, I told you about the investigation.

Configure the implant with NFC Shell, and perform some tests:

First test:
I established a scenario for access control, with an ARDUINO ONE and a PN532, it works correctly. Configure the AUTH0 = 00 and the PROT = 1 in the implant, the access control worked correctly, it is possible to read the UID of the implant without any authentication.
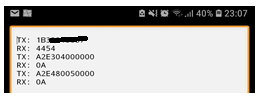
image
B1password
A2E3 04 00 00 00
A2E4 80 05 00 00

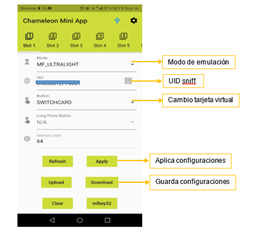
With a device called Chameleon mini I managed to clone the UID of the implant with a function called snif UID, I managed to detect the UID without requesting an authentication. With this device, I mock the access control.

image

Second test:

I established a scenario, in which the implant has stored information, I protected the implant with AUTH0 = 00 and PROT = 1. I thought the result was great, no APP (NFC Tool, TagWritter, NFC Tasks) managed to read or write on the implant , all of them gave me a reading error and I was surprised that no one asks for an authentication, it just shows me the reading error or it just does not detect anything. Even ARDUINO has some scrips developed for reading NTAG2xx and I can not read it either.

Third test:

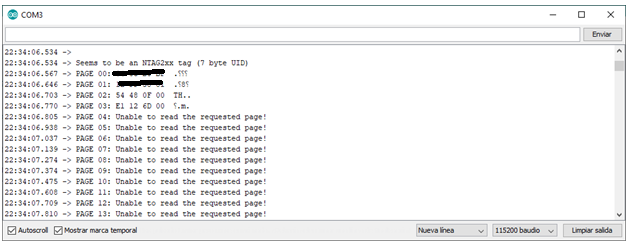
Change AUTH0 = 04 and PROT = 1, and the scrip of ARDUINO read until page 03, then only unidentified values ​​appear

image

Could you explain me a little because if you can read the UID when you set, AUTH0 = 00 and PROT = 1?

In other related topics you talk about the password, could you help me understand how that works, I want to achieve password hack of my implant, how do I do it? What use? Which reader has a password verification?

This seemed great to me, very good trick