I’ll save you the usual sermon… but pretend I said something against, willya? ![]()
Can’t agree more.
Also, trusting on this one:
So… first things first:
Sterilisation:
The most important thing will be to make sure that the injector does not touch anything between you unpacking it and getting it on your skin.
Make sure you have an area as clean as possible underneath (sterile field), but this is only to cover your bases in case you fumble.
The sterile field:
Ideally, use a pre packed sterile “sterile field”. If you can’t get your hands in one, then…
Better than paper towels (which have far too many crevasses for bacteria to hide), I tend to use a metal or glass tray/sheet, as mirrored as possible (less microfissures).
Immediately before the procedure I tend to use fresh sterile swabs (those individually packed) in 2 waves: first with something like a Dettol surface cleaner, rubbing well, then just with it’s alcohol, mostly to wipe away any residues of soap.
If you want to take extra care, you can set you tray in a solution of enzymatic soap, for 24 hours… or you can leave it in the freezer for 24 hours, then drop it onto boiling water. The metal might warp. This is also known as overkill and I don’t do that personally, but some folks recommend.
Alcohol
pay attention to which alcohol you are using.
Isopropyl alcohol works best at 70-75%%, but Ethanol works best at 85-90%. You probably want an isopropyl swab.
Tenting
Tenting will be very tricky. Using a binder will be a sanitising nightmare… but again, as long as it does not touch the wound directly and you clean it well after, you should be good.
Notes if using a binder:
- Keep a swab/paper towel (or a bunch), and always use that between your active hand and the binder (also not letting it touch the hand you’re applying onto), and throw it away after using once… This should make sure that the binder does not contaminate your active hand which, in turn, could contaminate the woundd while deressing it.
- when cleaning it, swipe from the wound in the direction of where the binder was in contact with the skin, then trash the swab, and swipe again with a new one.
Otherwise you might risk contaminating from the binder into the wound.
Another problem with binders is that they do not let the needle get in between them. so instead of putting the needle all the way in the tented skin, you will probably end up redirecting the needle deeper without noticing.
So first tent the skin as much as you want, with your hand… thent hent only 50% of that much skin with the binder.
If you are dexterous enough, get a string of thread (there are sterile thread packs for sutures), then the one end to the binder, and bite the other end. this way you can pull the tent up gently so you can actually have some room to work while safely avoiding your veins.
If you want to do this, practice a lot first!
Pre Application:
- Wash your hands thoroughly with some good antisseptic soap. I reccomend Hibiscrub if it’s available, or something similar. wash your hands for at least 2 full minutes.
- Overkill, but I tend to cut my nails as short as I can before an open wound practice (no need for a needle install, but who knows? if it costs you nothing, chop those nails away!)
- Do not leave any pen markings on your skin! if you really must mark it, try to use something like gentian violet and a new toothpick to draw. That will mark your skin well and also works as an anti-septic.
Now, to the juicier parts:
First, about the scar:
Try to avoid it.
If you are not used to piercing, it will most likely make you angle the insertion without even noticing. Plus the odds of getting a bad/scarring healing process will just increase.
and about the placement, I recommend this green line instead:
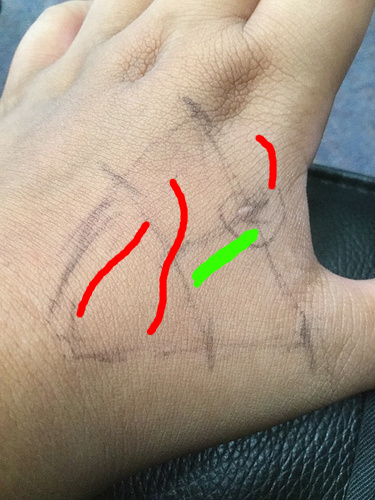
It is distant enough from the scar and since you want the chip to rest as much as it can in your hand, having it more parallel to the metacarpal bone from the index finger will cause it to move a bit less.
Also it should decrease a tiny bit the odds of you hitting your own Veins (which I guessed in red where they might be in your hand)
Of course that I am guessing it through a picture, and you should not take this guesswork for anything other than educational purposes. (actually, anything else from what I said either)