X series injectable healing helper?

I don’t really need anything :man_shrugging:t2:, I’m on the other side of the equation… my chips won’t migrate no matter how much I try to coax one to move…

Some people seem to have literal thin skin, and others like myself have thicker skin and fascia

I was just trying to point out it may not work my many

Ah, I thought they where for screws :joy:

3 Likes

They arent for screws?

How the f*ck I now get those screws out of my hand?

6 Likes

Well you’re… screwed!

3 Likes

I was considering using a bread clip. It’s something I have on hand. Ignore the pun. Place it with the hole over the chip and tape it down. Maybe padding on top, under the tape, to press it down firmly enough. I may still need to use toothpicks so it will dig in enough to block migration.

Hi all, quick sketch up I did to cover a problem I haven’t seen addressed yet.

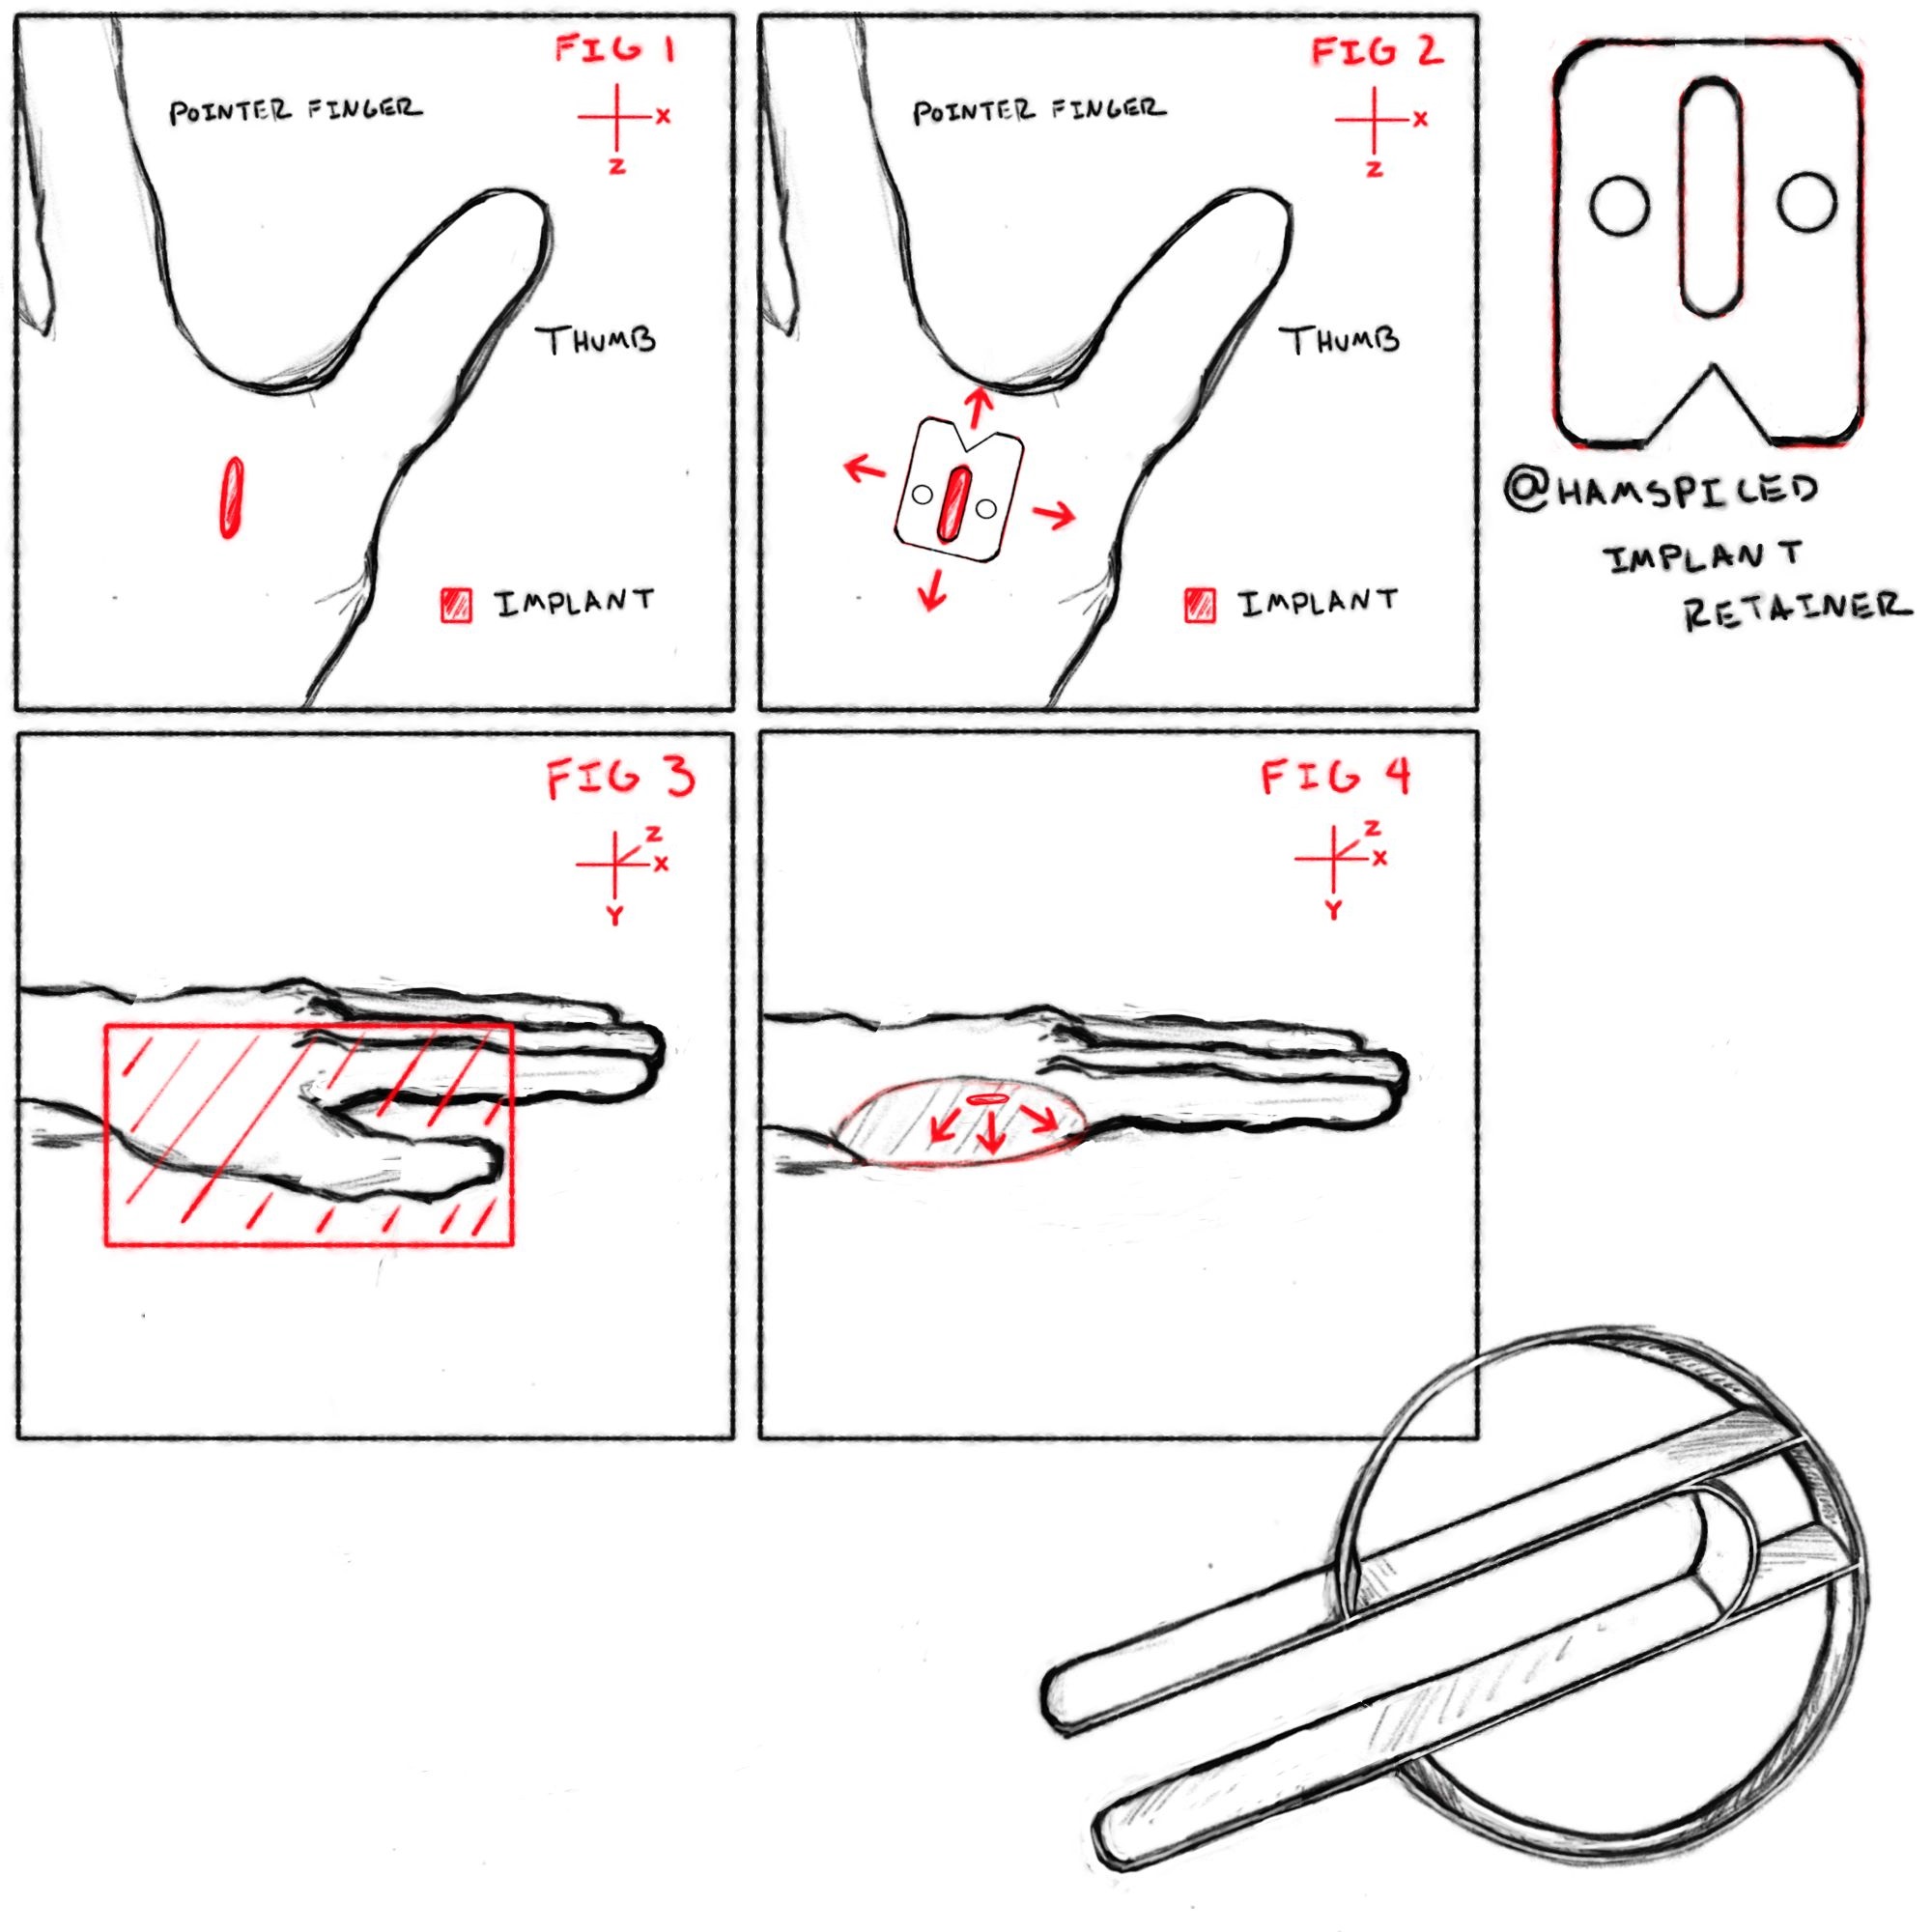
Fig. 1 displays an example implantation at location P0.

Fig. 2 displays the use of @Hamspiced implant retainer on the same implantation, which successfully impedes migration of the implant in the X or Z direction.

However;

Fig. 3 shows the P0 implantation from the side, where a red field indicates the cut away region as shown in Fig. 4.

Fig. 4 shows the freedom of the implant to migrate in the Y direction, and subsequently, others.

Observing this, it seems rational to me to suggest that some sort of compressive retainer be used in conjunction with the design made by @Hamspiced so that the implant is held from both the top and the bottom.

At the bottom right of the .jpeg there is a quick brainstorm of a concept for a 3D printable that could achieve this.

3 Likes

My quickly thought idea was to have this item printed in a flexible material like TPU. That way when secured to the area it can be molded around those areas like the blade.

I am also going to redesign a slim version that can be placed on a finger as well. Standby this will be a quick and dirty render

1 Like

Slimmer Version

Removed Registration (screw) holes.


Screenshot 2023-09-25 at 4.40.23 AM

Implant Helper Slim.stl (56.0 KB)

So this design is small enough that with strong surgical tape or even KT tape it will hold place well. Also with this design I could probably increase thickness to around 1mm so it holds deeper and not worry about it needing to form around an edge

3 Likes

This is mostly what I was thinking about. Thanks for the prototype picture.
In case I am able to get autodesk fusion 360 running properly on my machine I would be able to build the stl. Unfortunately the intel iris video chipset is pain in the a$$ and the studio is crashing all the time.

1 Like

I’m happy to make an .stl file as well, just wanted to wait on some community feedback, both on the Y migration problem and the compressive retainer.

I know that there is intrinsic musculature in the hand such as the Adductor Pollicis that will naturally act to inhibit the implants movement in the Y direction, however the implant doesn’t need to get past this musculature, only under the flat retaining device.

If you adduct your thumb, bringing it tight against the side of your hand and pointer finger like you would during install, you can see a large section of tissue become tented. Even using tape to hold it in place, I’m concerned the flat retainer will simple ride on the top skin of this tent, creating sufficient tissue depth for the implant to slip under the flat retainer. Now imagine there are many motions like this your hand makes in a day.

Note I do not have an implant so my concept of how deep they sit and move is vague. Hamspiced seems to think that with the adjusted 1mm thickness it should have adequate depth to prevent this drift, which I am not equipped to discredit or validate them on.

If the consensus is that the community wants a two piece retainer, or even just yourself, I would like to request feedback on the compressive retainer.

I have not designed springs before, but it is intended to function as a tangential torsion spring acting at two points along the compressive surfaces for even distribution of force across the implant site and strength redundancy in the component, as I have an SLA printer that produces brittle parts not ideal for mechanical applications.

I’ll be shocked if someone with a better knowledge of mechanical engineering can’t suggest a few improvements, optimizations, or a flat out better design.

Cheers.

1 Like

Taped a bread clip over my NExT this morning, under rolled up napkin. Cheap prototype.

Seems too thin to have much of an effect. I approve of increasing thickness. Will try tightening it when I change the tape. (At least having my hand covered in tape is reminding me not to move or grip things with that hand.)

If it’s thick enough to really press into the flesh, I wonder if the hard edge will irritate the skin? I might try cutting the shape out of foam or thick mole skin. Those with 3D printers could add a rounded bevel or lip if this is a concern.

2 Likes

My xMagic I installed recently is trying it’s darndest to moved back to the injection site and I’ve been trying to keep it in place. @Sanguifier if you’d like to shoot me an STL, I can print it tonight and test it out!

1 Like

Mole skin seems like a good use case. When I first stumbled across this thread I envisioned a bandage with a ‘O’ cut in the center made of mole skin, like what you would use on a blister.

I worried about sufficient holding force and the implant migrating underneath.

Would you be willing to provide me with some info?

If you tent up your skin by pressing your thumb into the side of your hand and pointer finger so there’s a lump, does the muscular tissue underneath push the implant up with it and hold it in place, or can it be push down further into the tissue, say, with a finger? If it can be pushed down, how far would you estimate before you feel it hit the solid layer of muscle and cannot push it further?

Edit: Millimeters preferred but will happily accept your estimate in any unit.

2 Likes

Sure thing.

1 Like

Here is the .stl as well as a sketch out creating a naming scheme for dimensions I foresee us needing to modify for ease of communication.

Happy printing!

ImplantCrimp.pdf (128.7 KB)

ImplantCrimp.STL (31.3 KB)

1 Like

First print was at 15% infill and it was too stiff. Printing again at 5% to get some flex in it.

1 Like

These two tabs shouldn’t connect. It’s going to create too much tension

2 Likes

The clamp isn’t really working for my install location, but I like what @Hamspiced suggested. I also tried to recreate your clamp but obviously I’m fricken exhausted because the dimensions aren’t quite right XD
I was thinking having two flanges (is that the right word?) jutting out from the back would be nice to help open the clamp.


I also quickly put this together which is going to help me in my case with the glassie being between two metacarpals. It has a ridge to sink down around the glassie. Figured I could use some med tape to secure it.


Stay Put v2.stl (331.5 KB)

3 Likes


Printed up a few of my own. The 3 mm thickness seems to give about the right flex for anyone trying to use standard resin. Maybe a tad strong.

The device itself was actually less cumbersome than I was expecting, with only fine motor skills involving the thumb causing it to shift. Things like turning a dial on a stove, or pinching with the thumb and forefinger. The shift was slight and a quick slapjob with tape kept it in place effectively.

For my hand at least, the contact height was too was too narrow. This combined with a some overlooked sharp edges on the contacting faces started to cause discomfort at about 45 minute to an hour. The device left a pretty good mark on both side of the hand, confirming its too tight. Especially considering the other retainer piece needs to fit underneath.

I think Ill try removing the rear tabs as Hamspiced suggested to see if the increased flex is enough to loosen it sufficiently or if I need to increase the contact height. I imagine any sort of end design will need to be available in at least a small range of sizes.

1 Like

ImplantCrimp-1.2.STL (147.5 KB)

Here is version 1.2

  • Rear tabs removed for increase flex.
  • Inner edges that contact the hand have been filleted 1 mm.

Probably wont try it out until tomorrow but I also never sleep so we’ll see what the night brings.

1 Like