New to Proxmark3 Easy -- Reference?

I bought a Proxmark3 EASY from Dangerous Things, and had no problem installing, flashing and running it. I’m tech savvy, and understand the basics of RFID, but new to the Proxmark. I’ve watched applicable videos from Dangerous Things, downloaded command cheat-sheets, skimmed topics in this forum, but is there a “reference” document or book somewhere? I need to learn more!

Example: I’ve had no trouble reading cards or fobs and cloning basic LF ones based only on ID number. I scanned a work-type badge and got the below… It’s HID rather than MIFARE, so how would I know if cloning it would require separate password steps, and what those would be? I haven’t found a tutorial on that. Just to try it, I ran CHK and found a password, but I have no idea what to do next, or if a basic clone write would be enough.

Here’s my sequence, below. Thank in advance!


[usb] pm3 → lf search

[=] NOTE: some demods output possible binary
[=] if it finds something that looks like a tag
[=] False Positives ARE possible
[=]
[=] Checking for known tags…
[=]
[+] [C1k35s ] HID Corporate 1000 35-bit std FC: 3100 CN: 45621 parity ( ok )
[=] found 1 matching format
[+] DemodBuffer:
[+] 1D555996955A955669656999

[=] raw: 00000000000000298381646a

[+] Valid HID Prox ID found!

[+] Chipset detection: EM4x05 / EM4x69
[?] Hint: try lf em 4x05 commands
[usb] pm3 → lf em 4x05 chk

[+] loaded 124 keys from dictionary file C:\ProxSpace\pm3\proxmark3\client\dictionaries/t55xx_default_pwds.dic
[=] press to exit
[=] testing 51243648
[=] testing 000D8787
[=] testing 19920427
[=] testing 50524F58
[+] found valid password [ 50524F58 ]

[+] time in check pwd 1 seconds

[usb] pm3 →
LF is incredibly easy to clone especially what youve got here.
you dont needpassword auth or anything, thats usually to prevent reads or write protect, in this case nonexistant.

you literally just do lf hid clone -r 298381646a onto a t5577 and boom its done.

theres no correlated wealth of knowledge for tactics with RFID its mostly all community knowledge through asking questions and searching. big recommends you join the discord servers

unofficial DT discord

iceman discord

1 Like

Thank you, Rage!

Next question:

What is the button press and light sequences set as the default in the current release by Dangerous Things in their Proxmark3 EASY? I presume these would be modes for standalone function when you have the PM3 EASY hooked up to external power. I’ve only been able to find references for much older versions, none of which refer to the current hardware’s blue, amber, red and green led series…

2 Likes

I think your best chance at a reference would be the GitHub repo for the Iceman branch firmware. That would be the most likely place for the most up-to-date information regarding functions of that firmware branch.

The reason a universal reference document doesn’t exist is because of these varying firmware branches and their somewhat fits-and-starts approach to updates, combined with the fact that many functions are supplied by different people. This is an open source effort after all.

In fact, one of the things Iceman is trying to do is standardize the command syntax and behavior. A lot of the contributions to his branch, like many others, is spread across many different authors… and their approaches will vary. To his credit, he is trying to standardize those things under his own firmware branch and get contributors to play along with the same schema.

Your best bet is to keep updating to the latest Iceman branch and check the GitHub repo for the latest documentation. I do know that one of the goals for development of this branch is to include as much command documentation as possible into the actual client itself. The idea that you can always supply a command with no parameters and get back a helpful set of options in the help screen is common to computer software but was completely lacking for proxmark features. That is changing though… thankfully.

1 Like

Nobody answered my questions about the lights on the newer version of the PM3 EASY, but I found that if you have it connected to the computer while putting it into standalone mode, you can see what it’s doing. I documented it here in case any other newbie folks are looking for it.

  • = - = - = - = - = - = - = - = - = - = - = - =

Hold button 2 seconds – blue/amber/red/green indicator lights flash in sequence and it puts the PM3 EASY into standalone mode; all colored indicator lights go back off. (If you have it connected to the computer, you will be able to follow along on screen.)

#1. Short press – green light stays on, red light blinks. It is looking for an LF HID tag to read into “green” memory slot. When exposed to readable tag, red light goes out and green light flashes, indicating successful read, then both lights go off. If you press the button before a successful read, green light blinks 5 times and PM3 goes into standby mode. Single press here while in standby mode will put it back into #1.

#2. Short press – orange light stays on, indicating simulating previously read HID

#3. Short press – orange and green lights flash one time, then go out, indicating simulating done

#4. Short press – red and green lights blink while cloning previously read HID, then lights go out when done.

#5. Short press – blue light comes on, red light blinks. It is looking for another LF HID tag to put into “blue” memory slot. When exposed to readable tag, red light goes out and blue light flashes, indicating successful read, then all lights go off. If you press the button before a successful read, blue light blinks 5 times and PM3 goes into standby mode. Single press here while in standby mode will put it back into #5.

#6. Short press – orange light stays on, indicating simulating most recently read HID

#7. Short press – orange and blue lights flash one time, then go out, indicating simulating done

#8. Short press – red/green/blue blink while cloning most recently read HID, then lights go out when done.

CYCLE COMPLETE… next short press goes back to #1.

4 Likes

Dude, thats awesome, I started a draft a while ago for the Handy Dandy Thread, But I only found the RDV4 older style light sequences ( It was pretty and with pictures, but out of date ) I didn’t need it and couldn’t be botherd searching for the info at the time

so if you are happy, I might put your upto date and community verified info in the Handy dandy thread!?

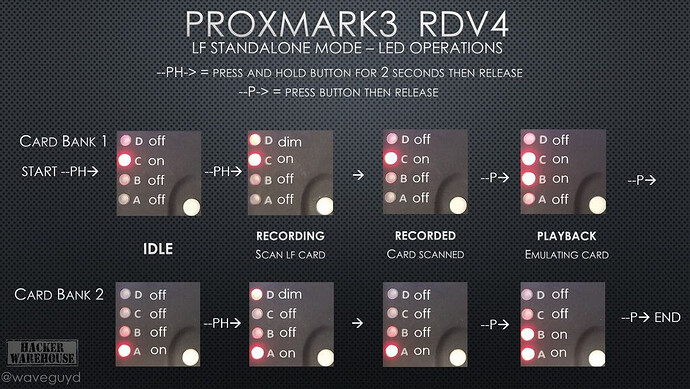
This is what I had started, Not sure if there are any tidbits in there that may be of use

PROXMARK Standalone ( headless mode )

The image below is the light patterns for the RDV4 but the Easy may have the same LEDs

Thanks to Troy over at Hacker Warehouse for the image

With the RDV4 you also have the option of the BlueShark
“Standalone” add on ~USD$100

The only problem with this is that the standalone mode can be changed fairly easily, and a different standalone mode might use the lights and button very differently.

1 Like

Indeed.

It is far from ideal
But @Concorde still did a great job of documenting, what I am assuming is Samy Kamkar’s (clever mother fucker) standalone mode

1 Like

Pilgrim, yes, please feel free to repost or reformat my notes in a different way, with or without credit/attribution. Meanwhile, I’ve added the same info that’s here to the Handy Dandy Tips thread.

Zwack, I think the “default” (yes, it is the “Samy” setup) is what people need to see… if they change it, they’ll already know what they’ve changed it to! :wink:

2 Likes

I would hope that they know, and this is a great write up of the default samy standalone mode.

It would be even better if each standalone mode came with documentation this good about how you use it and what the lights mean. :slightly_smiling_face:

1 Like