Quick guide on how i use my Implant to control my Mac.
There are a lot of different scripts available for PC and Androids to interact with your implants but not many that can use OSX. Using 3 apps i can replicate very similar actions that i can use Tasker with on Android.
My particular use case is 2FA. My company has very strict 2fa protocols in place which require me to login to our systems every 30 min using Google Authenticator. I have switched Auth providors to Authy so this guide will just cover using the IOS app install of authy on my Mac OSX.
Things Needed
1 - Card Reader - You can use an ACR122u I am using currently the ACR1252 but friday im getting the new ACR1552. It doesnt matter what reader you use as long as you can read and write to it
2. Apple Shortcuts.app - this is an Apple Application, at the time of writing i am using V7
3. NFC Ideas - This is what i am using to write the URI to the chip/card. You can use anything you like
Setup Your Hardware
Plug your reader into your computer and run NFC Ideas. Make sure it can read your chip. If it cannot read your chip you might have to stop here. If it can you should be good to move forward
Setup Software
- Open up the Shortcuts app.
- Click the plus in the Middle Upper Right

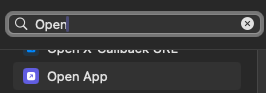
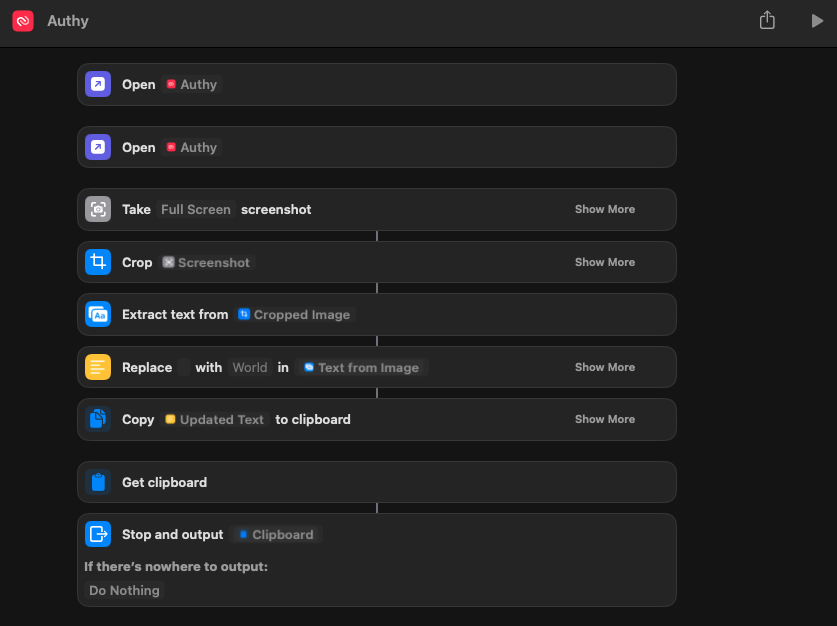
- This is where we start building the Macro on what we want to do. Shortcuts is basically a macro building application. It has a lot of potiential but in my case i will show how i have it capture the 2FA token of my org. The first action we need it to do is Open the 2FA app Authy. In the top type Open, scroll down to the scripting section and choose Open App
- I had issues with this actually opening so i have this action twice. Repeat step 3.
- Next We need to take a screenshot of the open screen. Type Take in the search box, select take screenshot
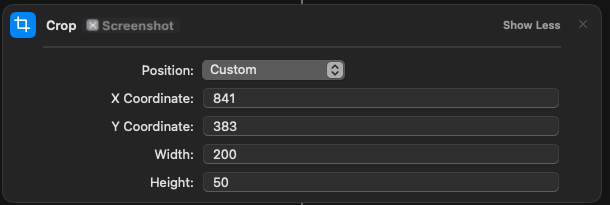
- Search for “Crop” and select the position as “Custom”. Have it crop the screenshot to just the area that the six digit 2FA code is in. It uses x/y values so you can use the screenshot cropping tool to get your exact cropped area.
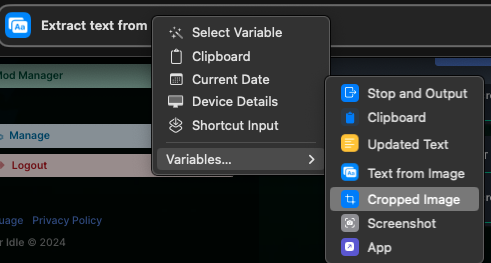
- Search for Extract Text from Image. Choose “Cropped Image”. Click Image, Choose Variables, Select Cropped Image
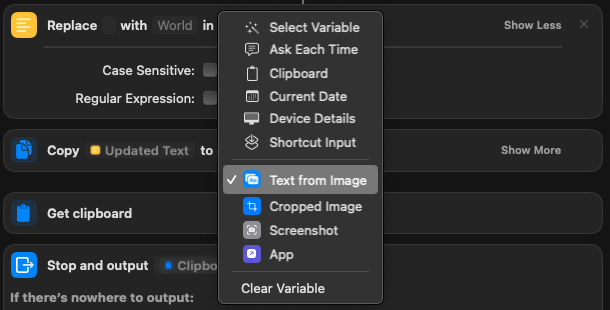
- Search for Replace Text. I have it replace " " i leave the next section blank, it says world and after in, right click, and choose “Text from image”. This way if it says something odd i can just remove the word from the pasted 2fa key.
- search for Copy to Clipboard. Right click “text from image” choose Variables, and click “Updated Text”
- search for “Get Clipboard”
- Search for Stop and Output.
At this point your shortcut should look like this.
You can click the play button in the upper right to test the scenario. if it is successful if you hit paste, it should have a 6 digit code. You can close the window if you are happy, it autosaves.
Autorunning the Shortcut
Now we need to program a URI that calls the Shortcuts app in OSX and runs the “Authy” shortcut. It can be done with this URI. You will replace “Authy” with whatever you named your shortcut
shortcuts://run-shortcut?name=Authy
At this point you can write the above code to a test card, or your implant. Now when scanned it will call the shortcut, open Authy, take a screenshot, read the 2FA key, and copy it to your clipboard. If you have NFC Ideas running it will automatically run the URI when scanned. It doesnt work with NFC Tools.
If you have problems writing to your implant with NFC Ideas. as possible work around you can write to a card, copy the card info to a flipper and use the flipper to write to your implant. This works on a Xmagic and a Xsiid.
The Shortcuts application is Very Powerful. You can automate a lot of mundane tasks with OSX using it, however i havent found a way to just take the UUID from the chip and use that for automation yet.
