Requirements
Tasker ($)
Unified Remote for Android ($)
Unified Remote Server for Windows
AutoTools ($)
Install Tasker, Unified Remote and AutoTools on your android phone.
Install Unified Remote Server on your PC.
Configure the applications on both devices so they are to your fondness.
Step one, got to save PC-login info on phone “safely”.
We will do that with Taskers “variable set” and AutoTools “text” (which allows you to encrypt it).
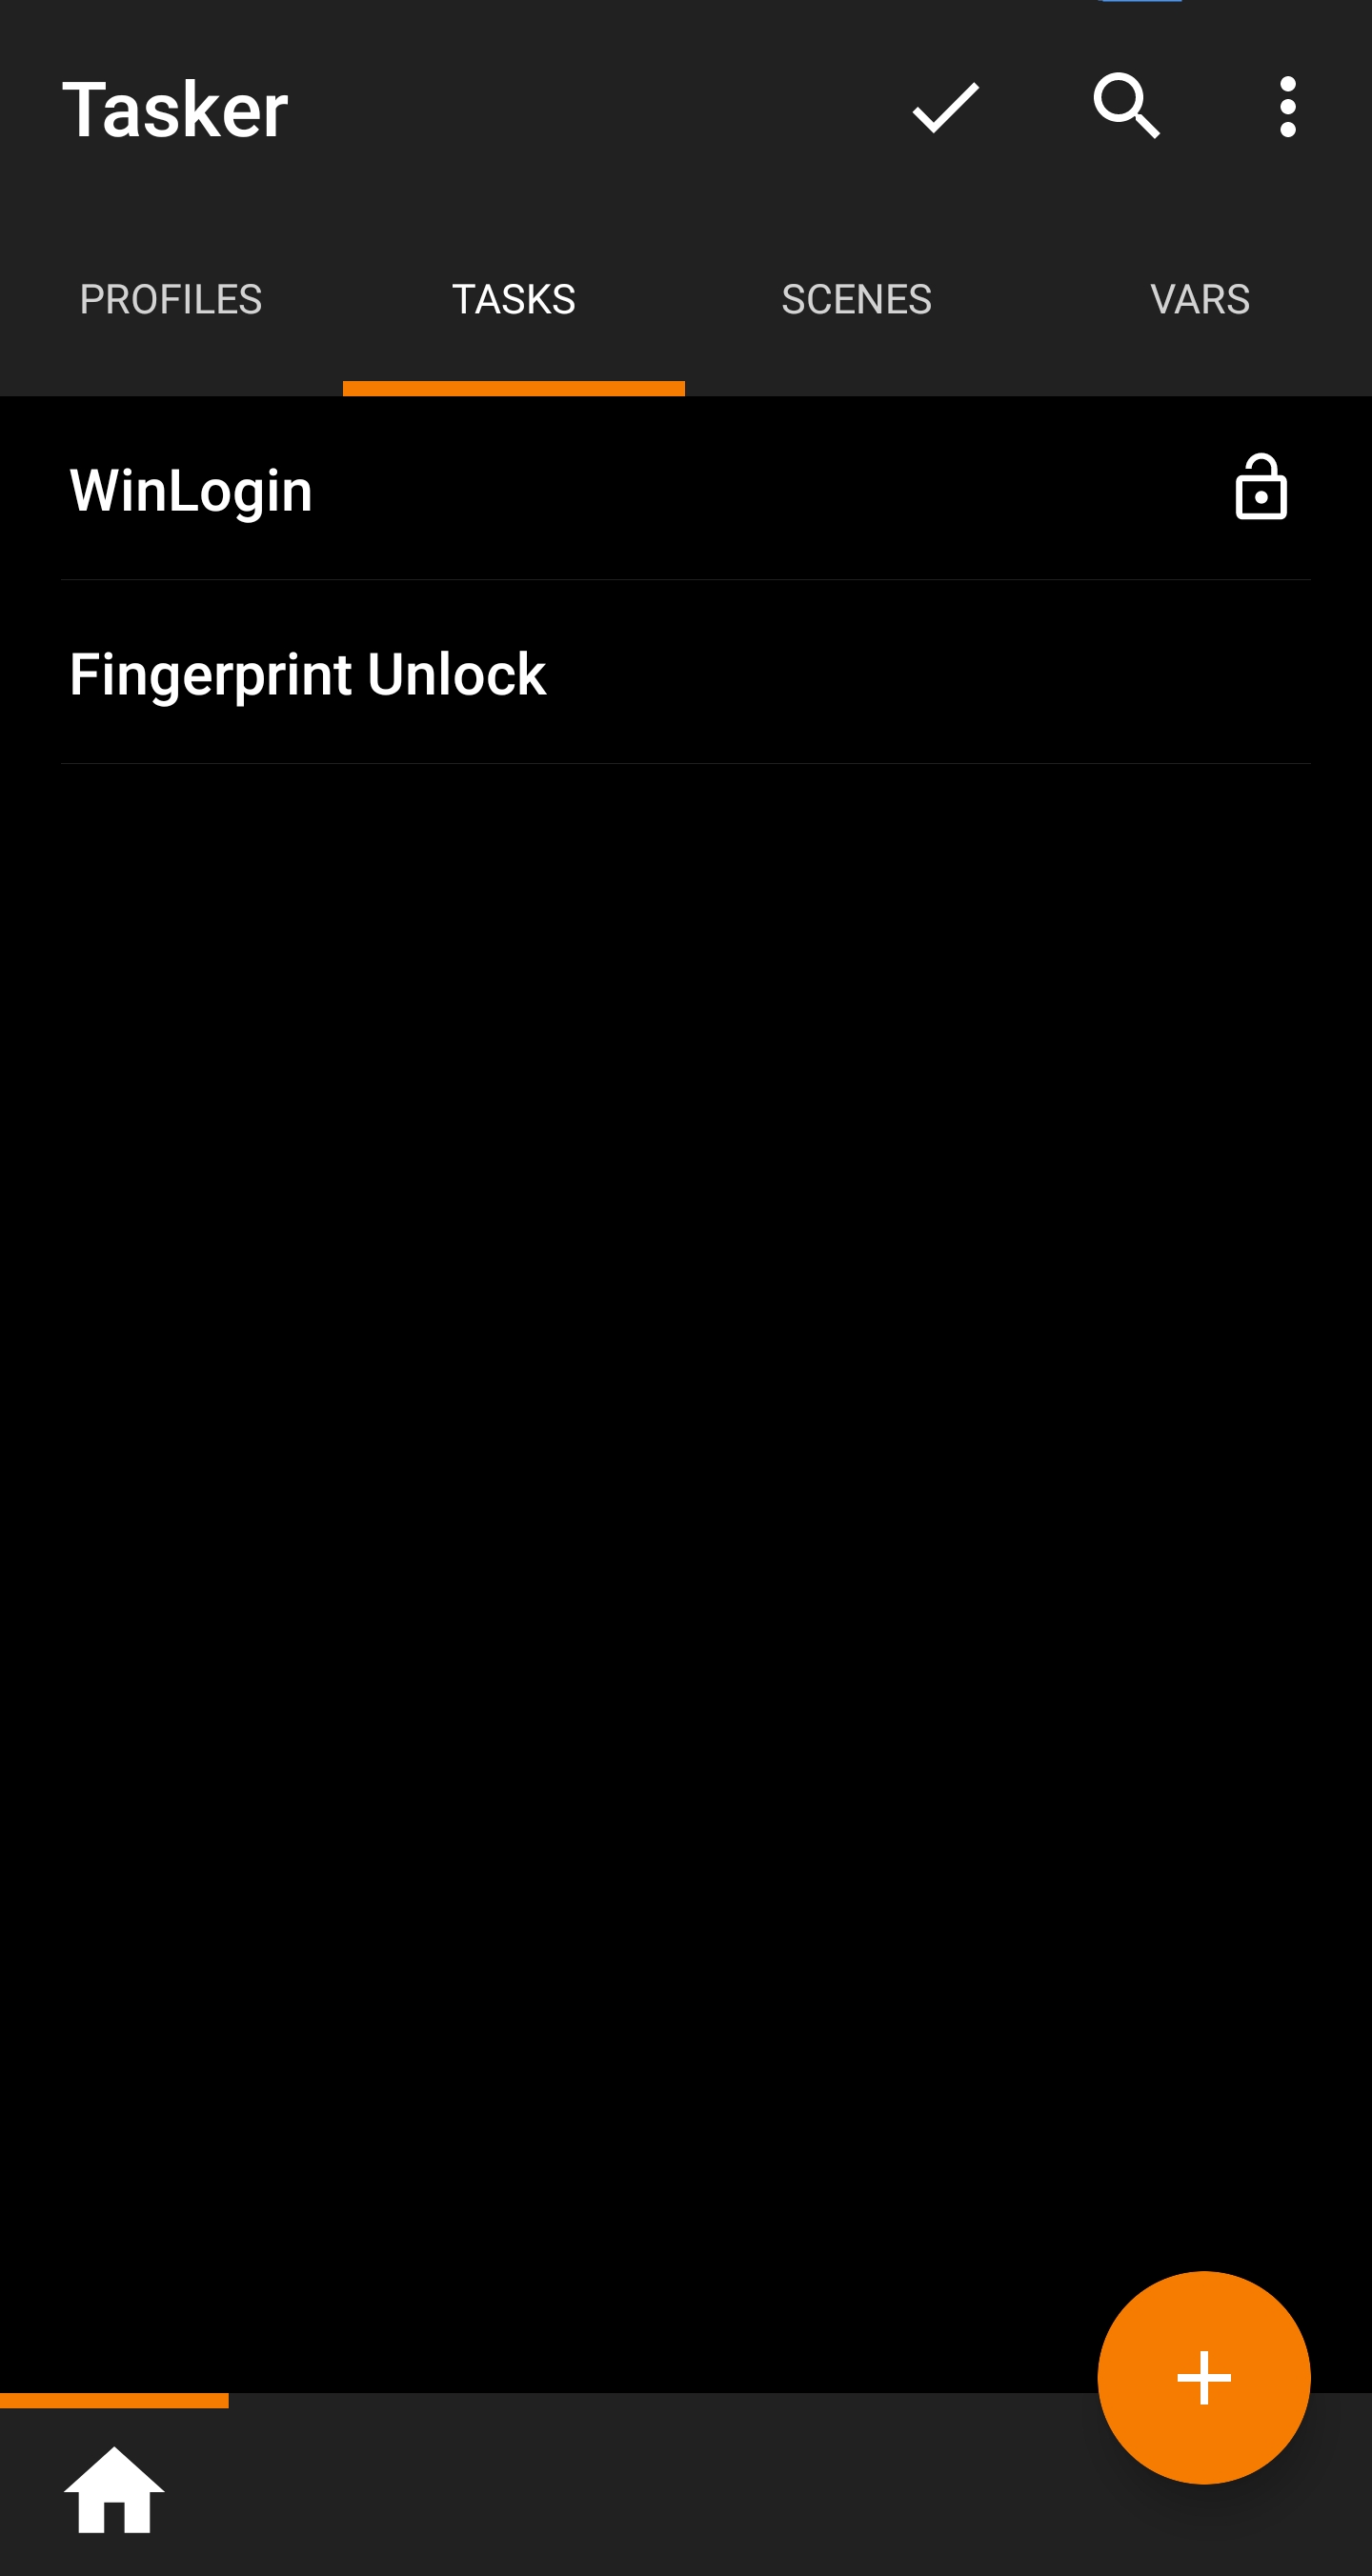
Open the Tasker app on phone.
Go to Tasks-tab.
Press the big + button.
Choose a name for your task.
You should be in Task Edit now.
Press the big + button.
Choose:
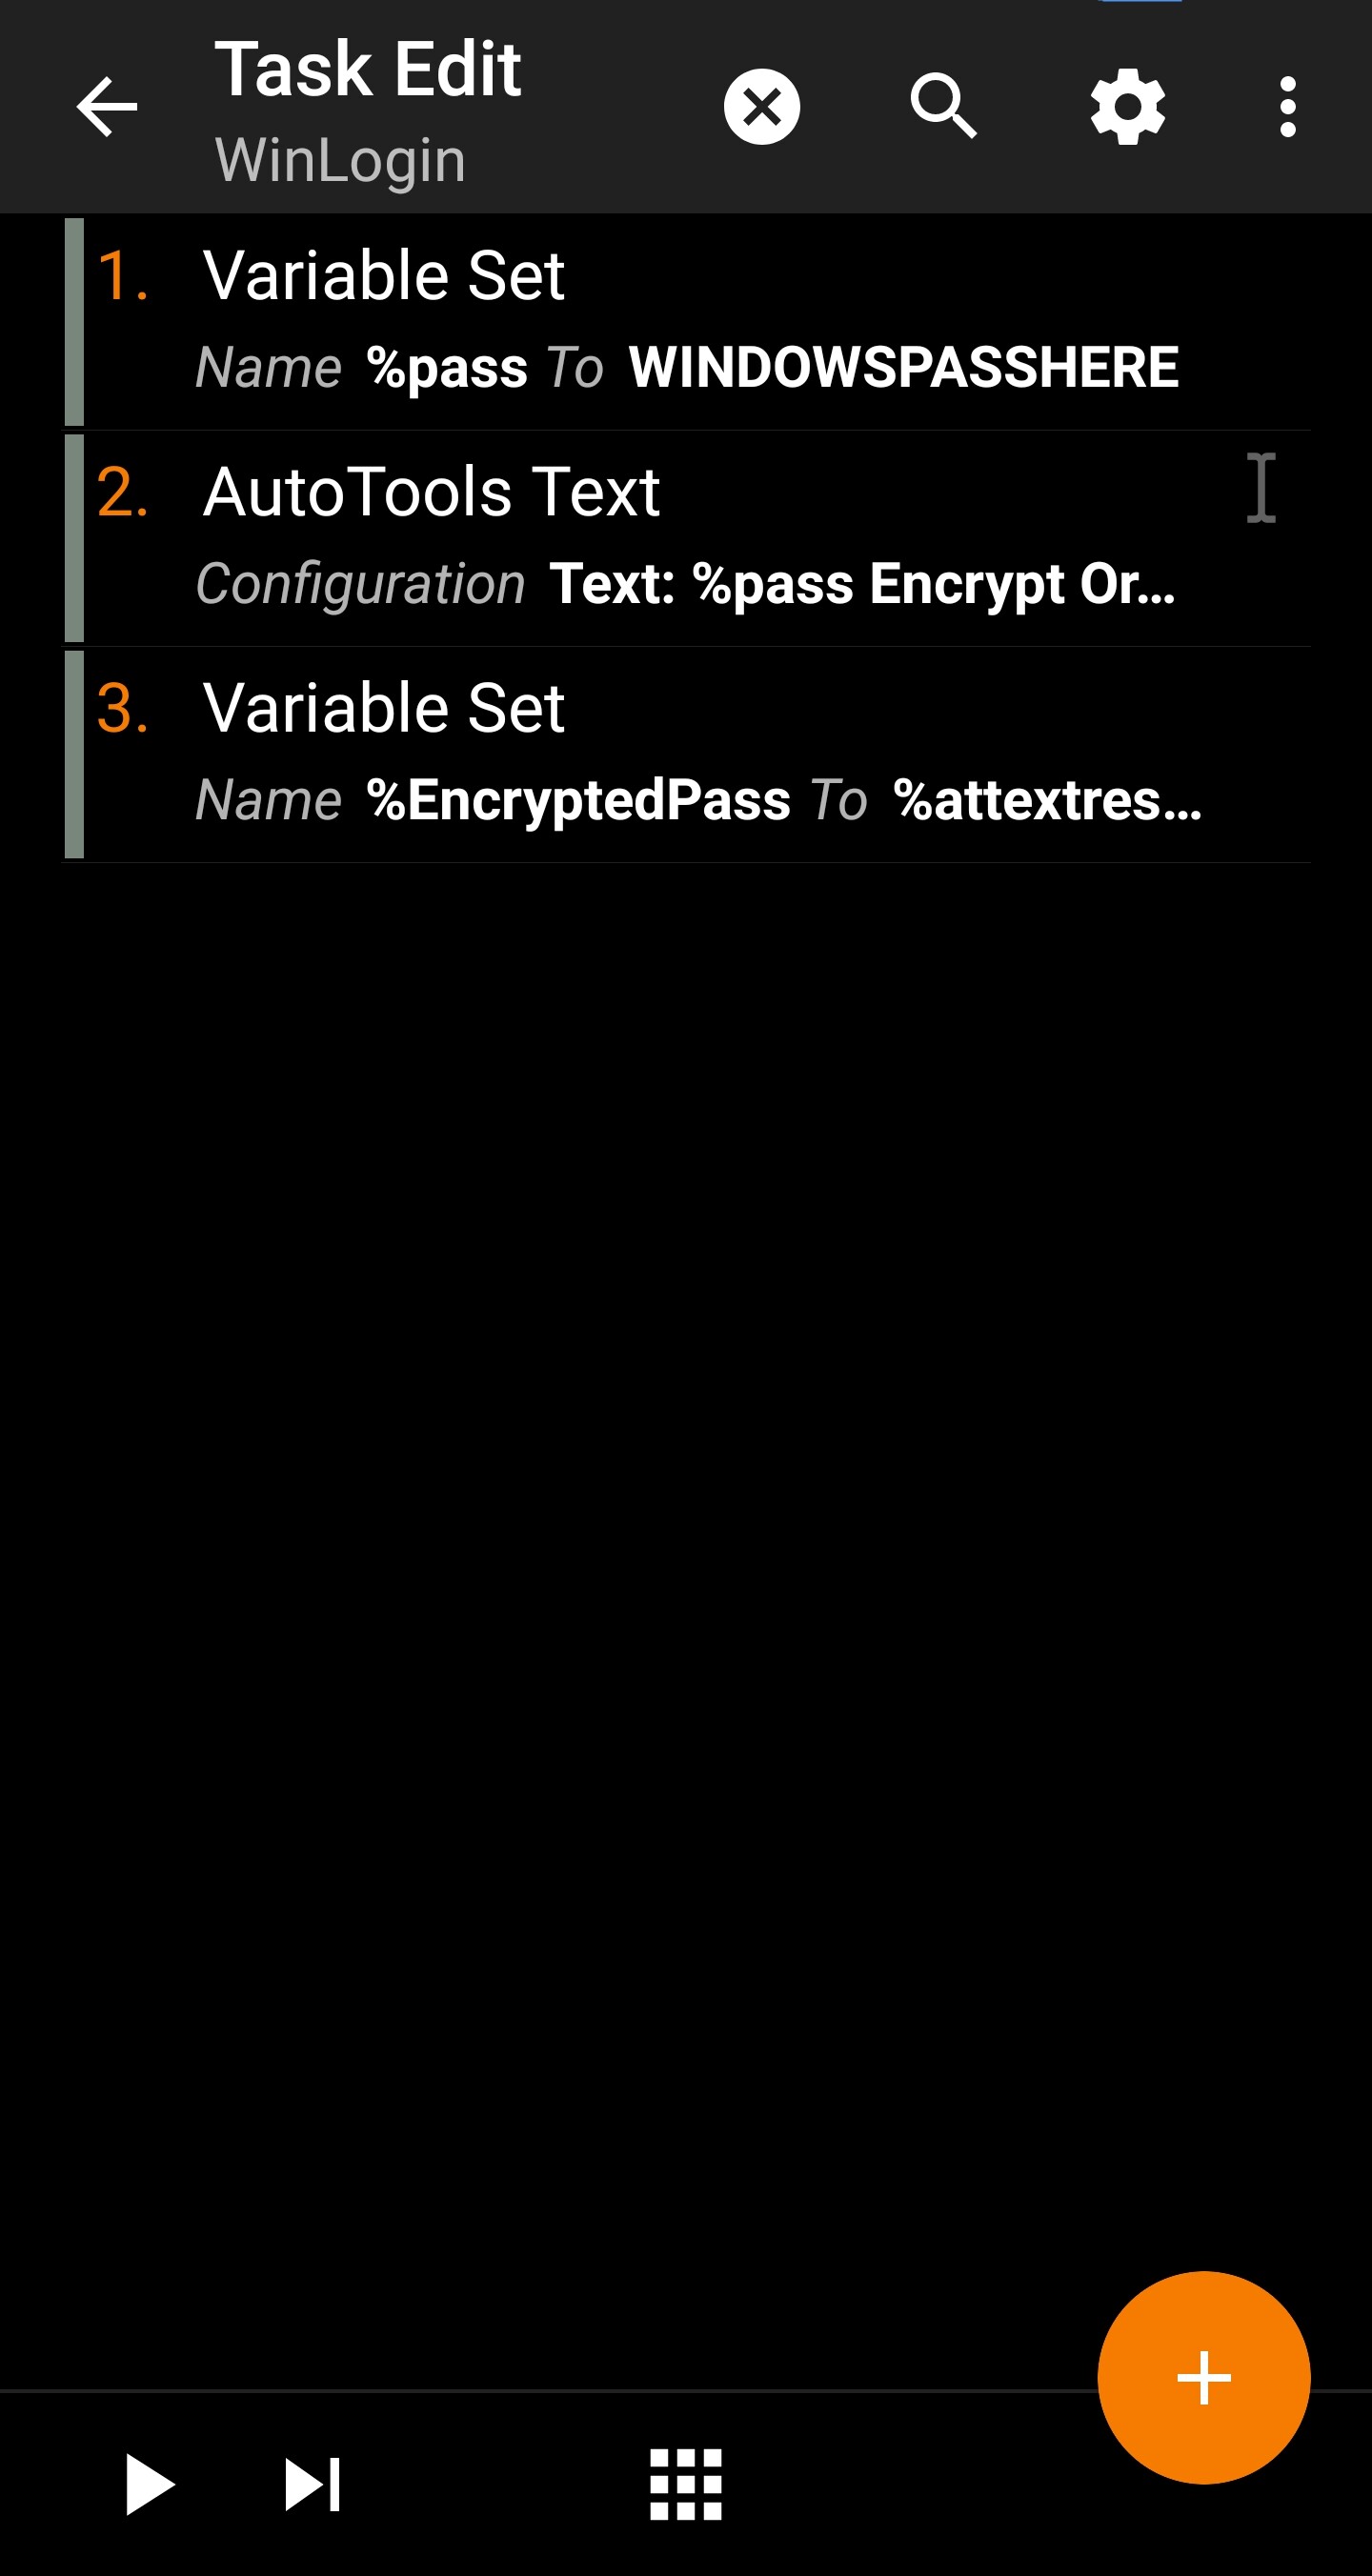
Variables –> Variable Set. Name: %pass
To: YOUR-PC-PASSWORD
Go back to the Task Edit Page.
Choose:
Plugins –> AutoTools –> AutoTools Text.
Text: %pass
Then go to Encryption,
set it to Encrypt and set your encryption password/phrase.
You will need to remember this phrase, you will need it later to decrypt.
Go back to the Task Edit Page.
Choose:
Variables –> Variable Set.
Name: %EncryptedPass
To: %attextresult()
This will store the encrypted password in a global variable.
Run this task. You should see your %EncryptedPass in the VARS tab.
Now you can delete this task so you don’t have your plaintext PC password on you phone.
Alternatively, you can change the “To:” field to WINDOWSPASSHERE like I did in the picture above if you want to keep the task on your phone.
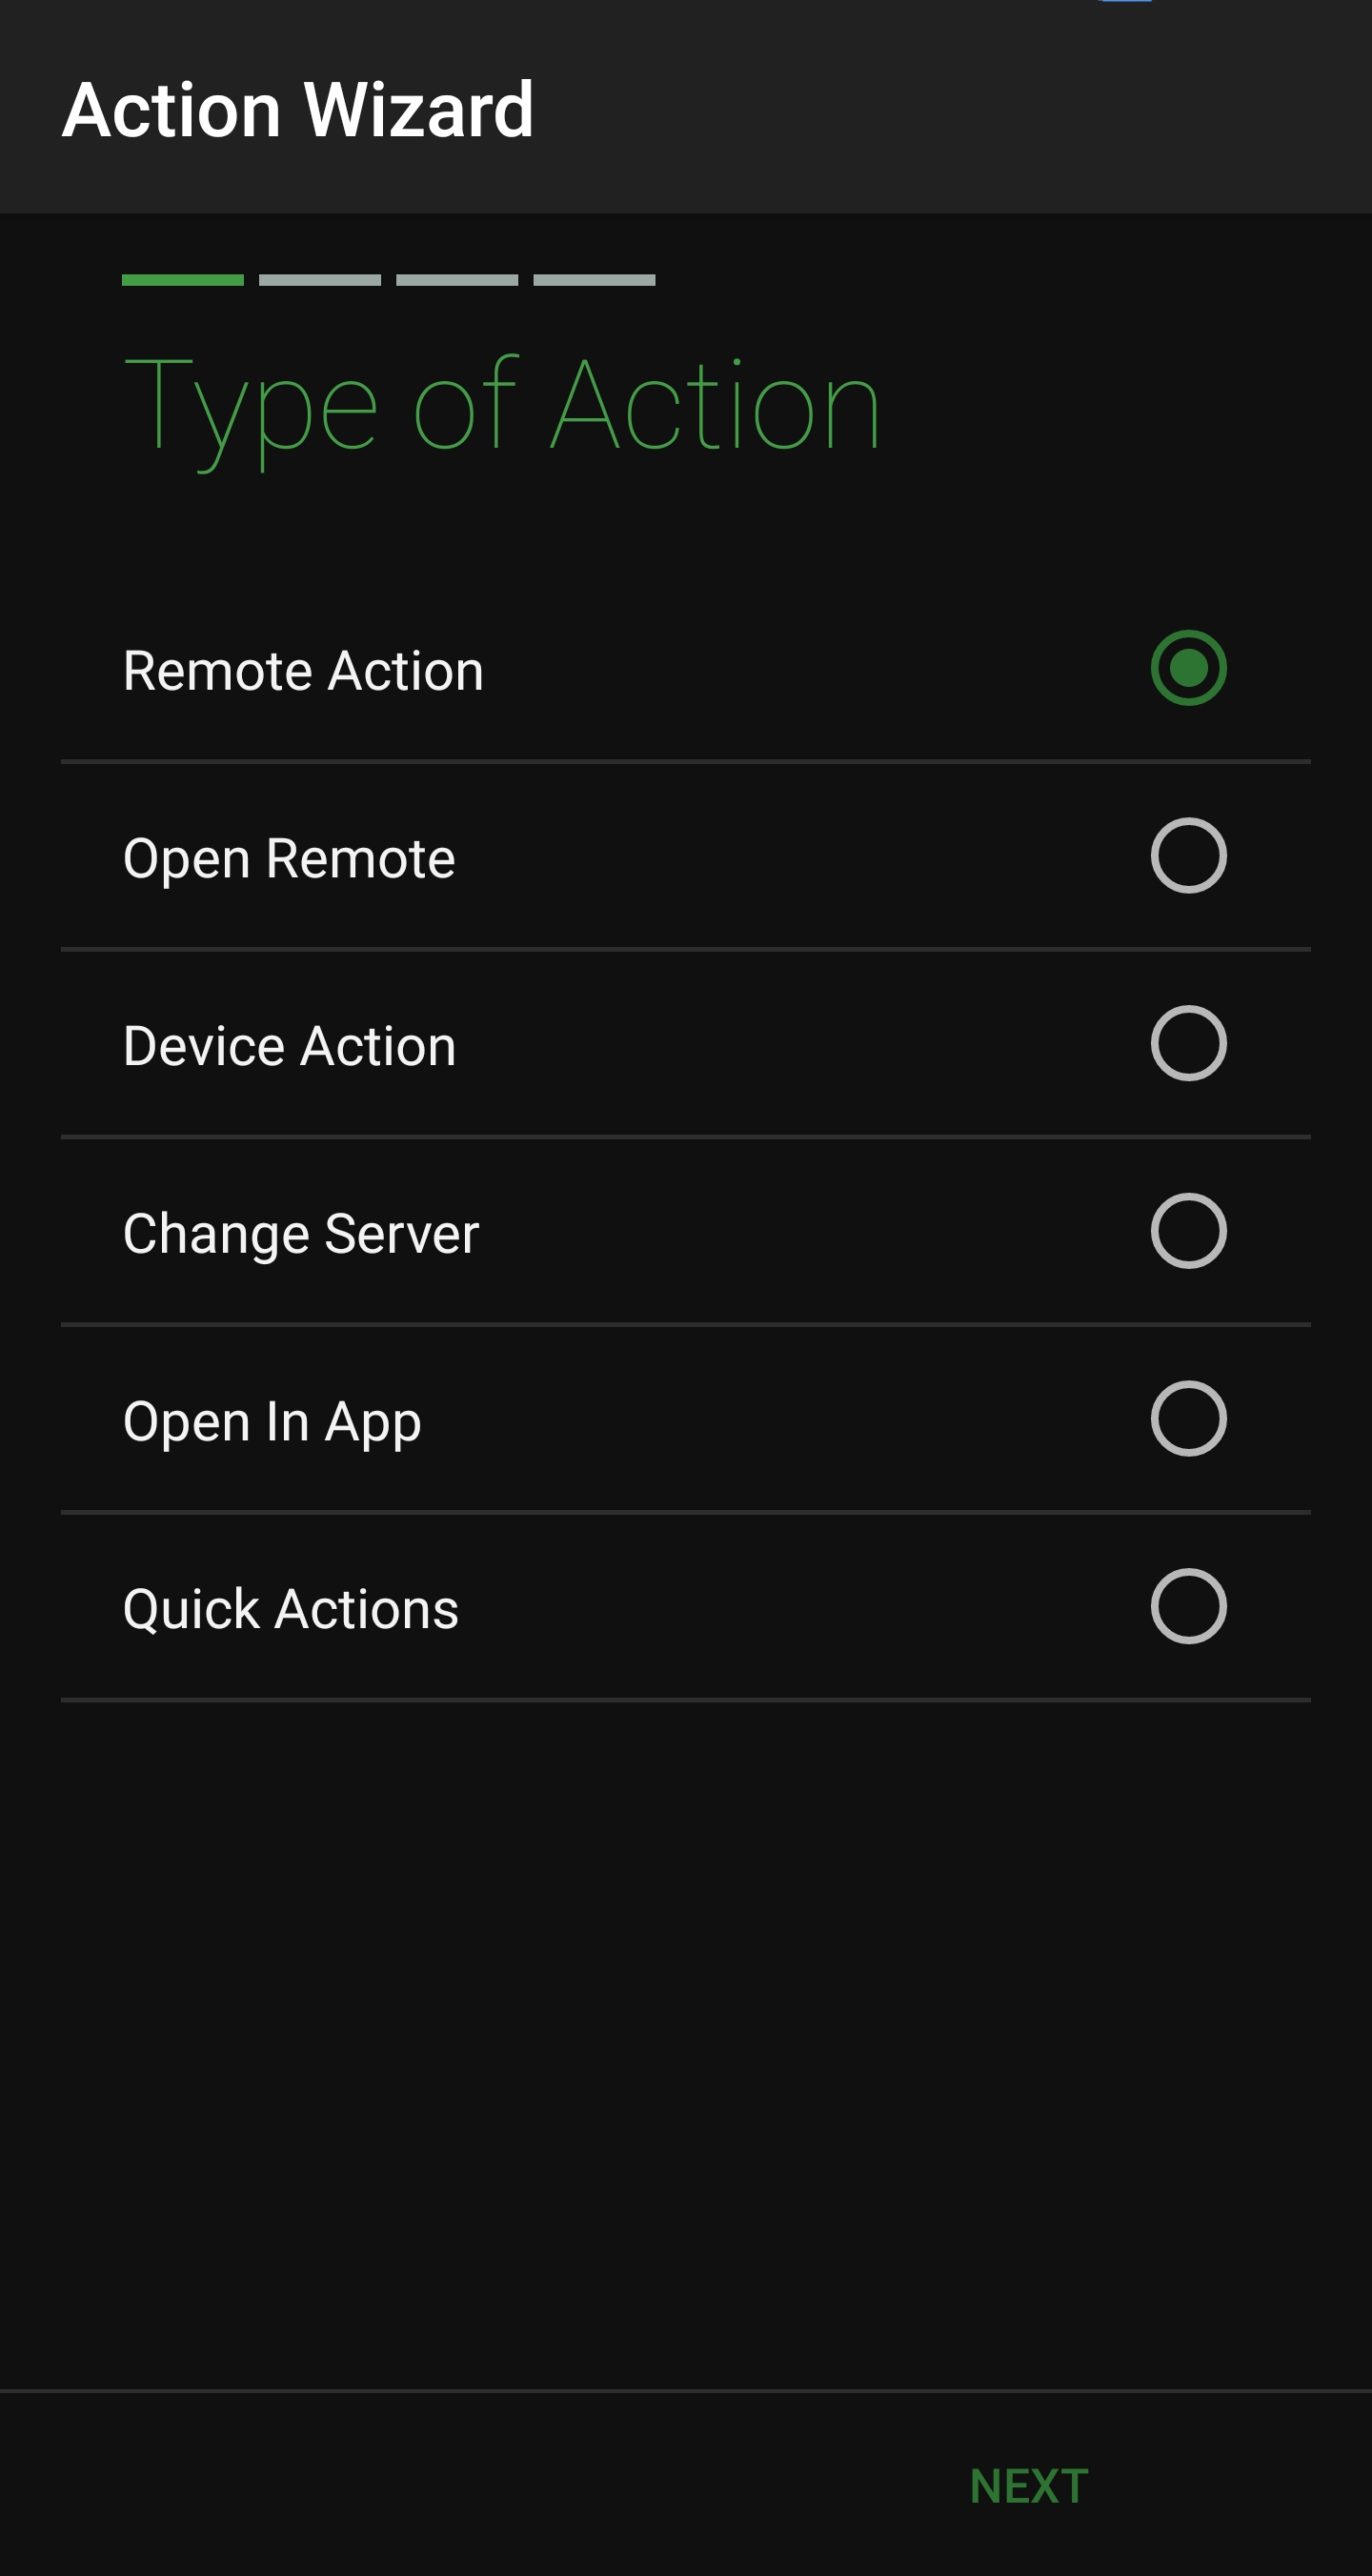
Step two. Create a new task.
Go to Tasks-tab.
Press the big + button again and chose a name, I chose Fingerprint Unlock.
Choose:
-
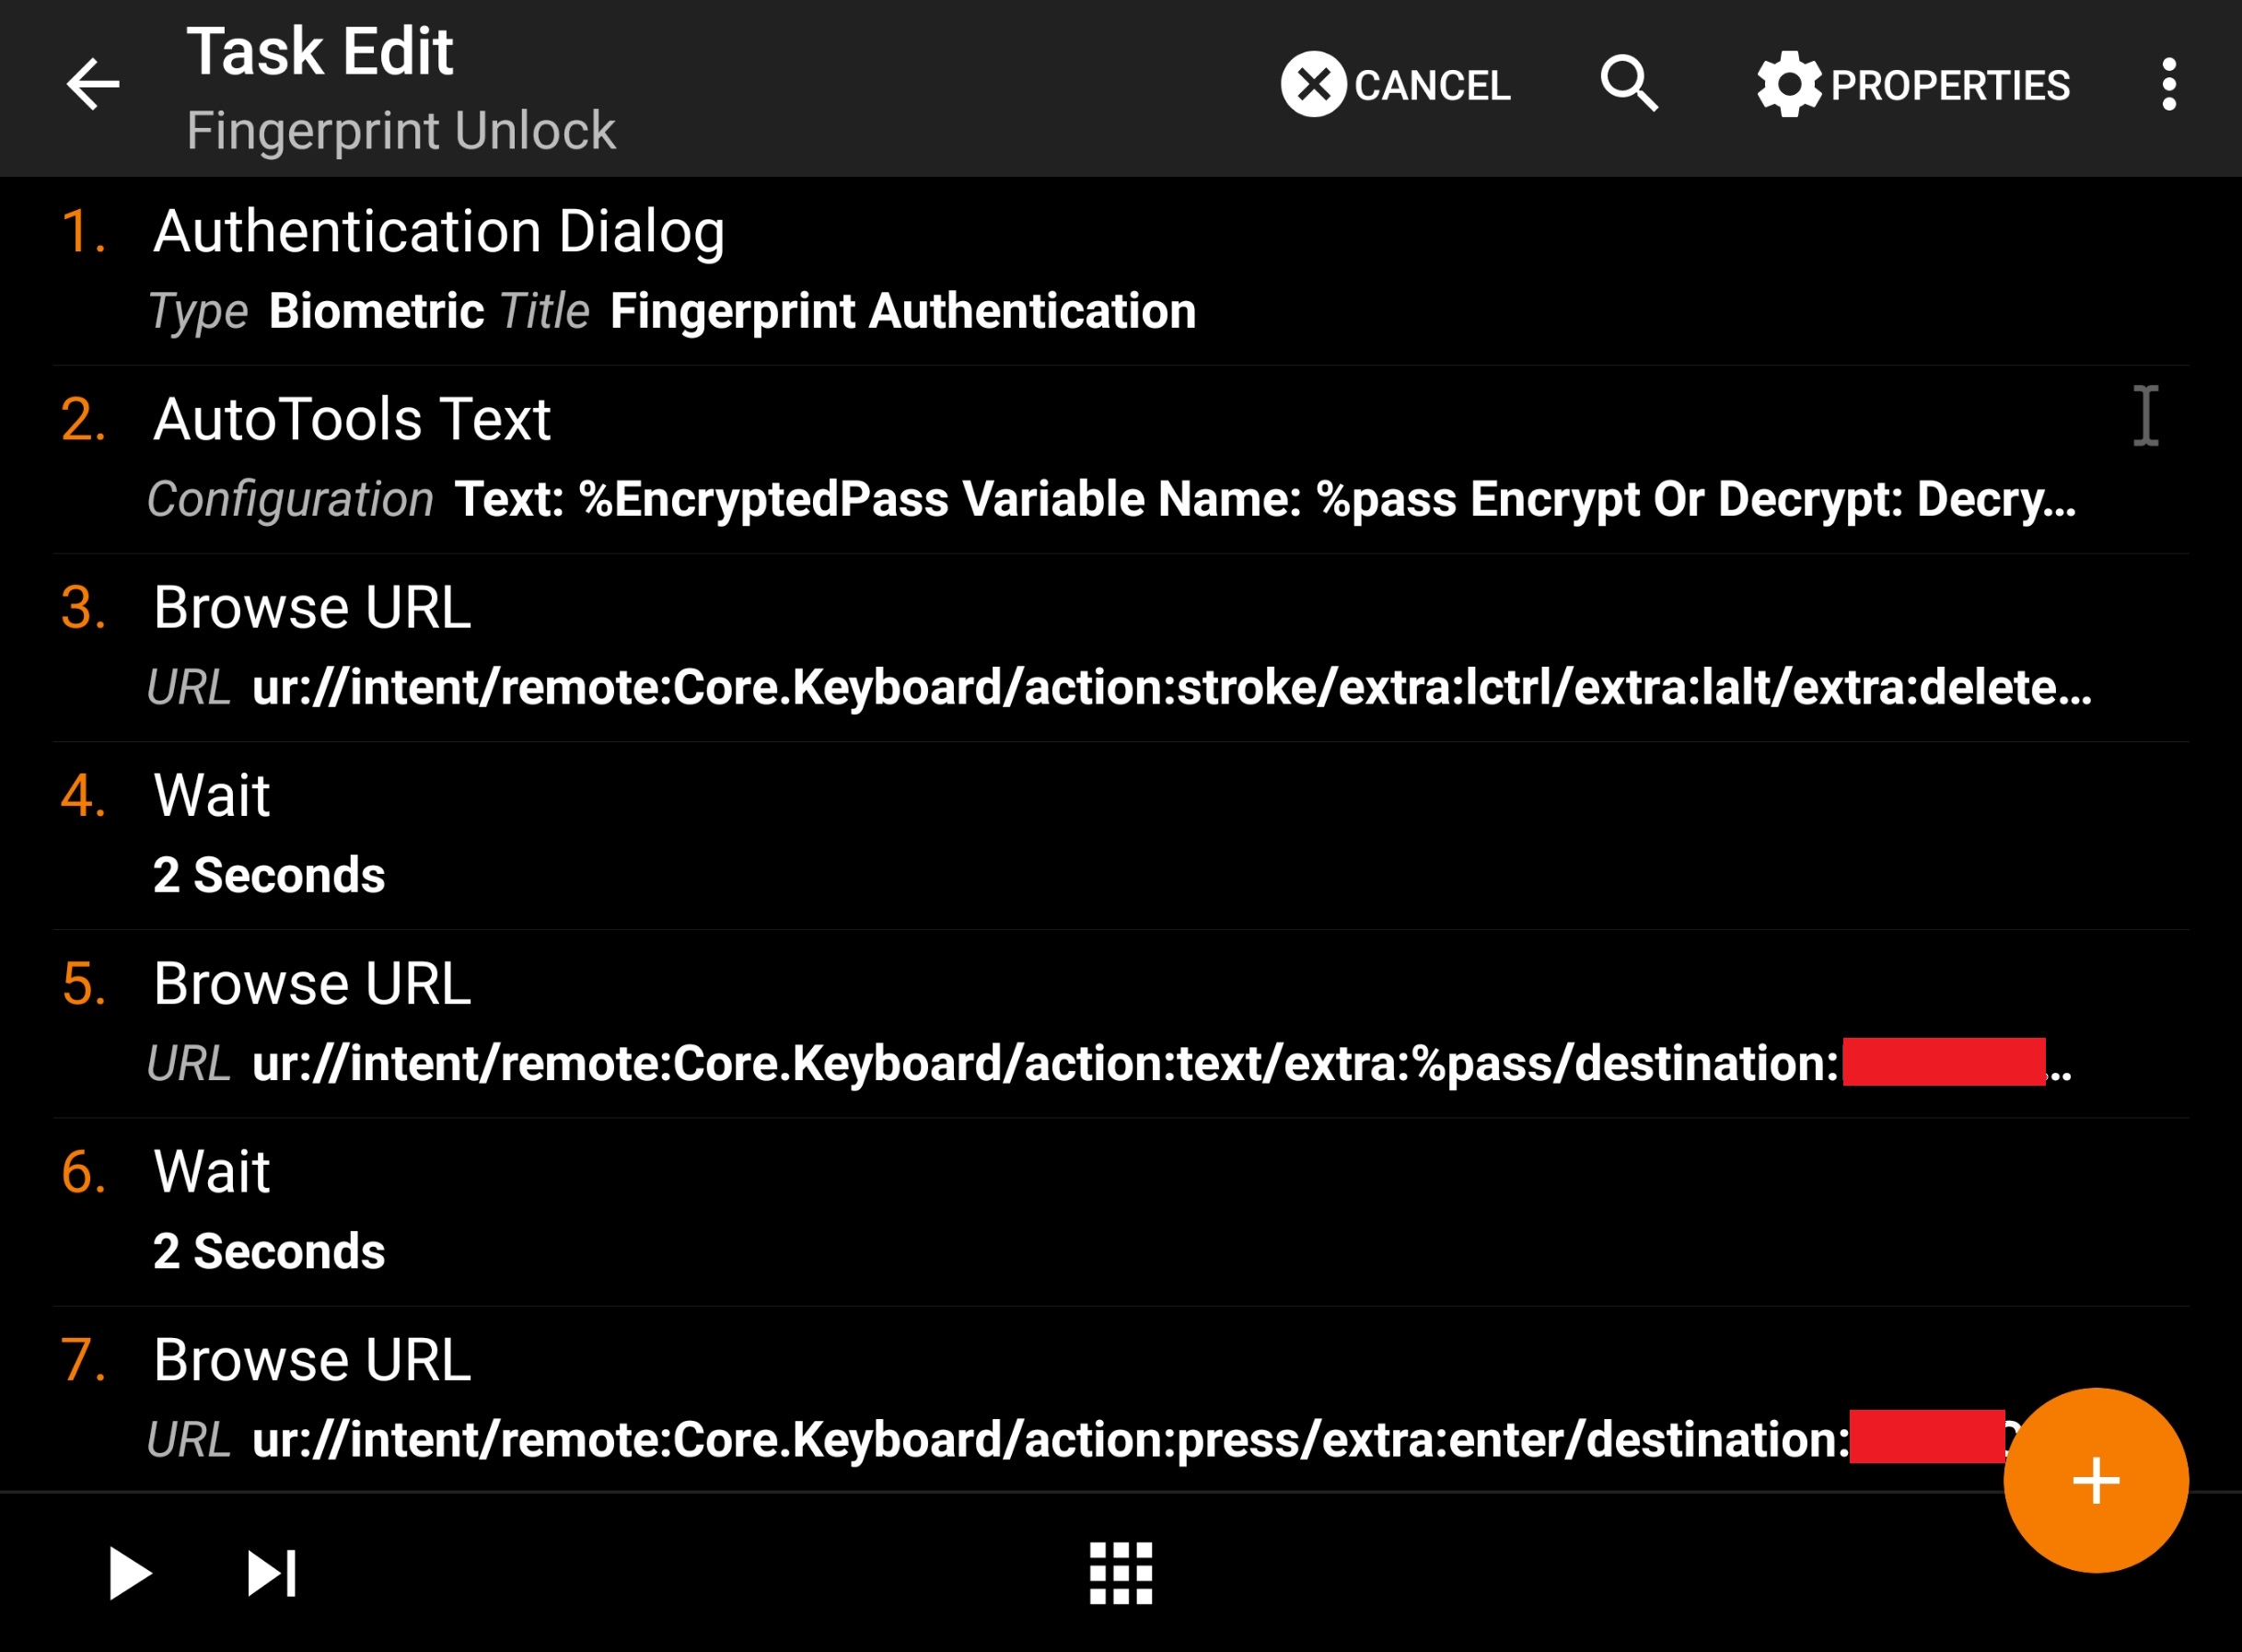
Input –> Authentication Dialog
Type: Biometric
Title: Fingerprint Authentication
Number of attempts: 2 (choose wisely)
Confirmation Required: Check
Device Credentials Allowed: Check
(this first option is optional, I have biometrics active on my phone and I chose it add it, you can ofc customize it to your preference) -
Plugins –> AutoTools –> AutoTools Text
Text: %EncryptedPass
Variable Name: %pass
Go to encryption and select to Decrypt.
For the password, use the encryption password/phrase you made earlier.
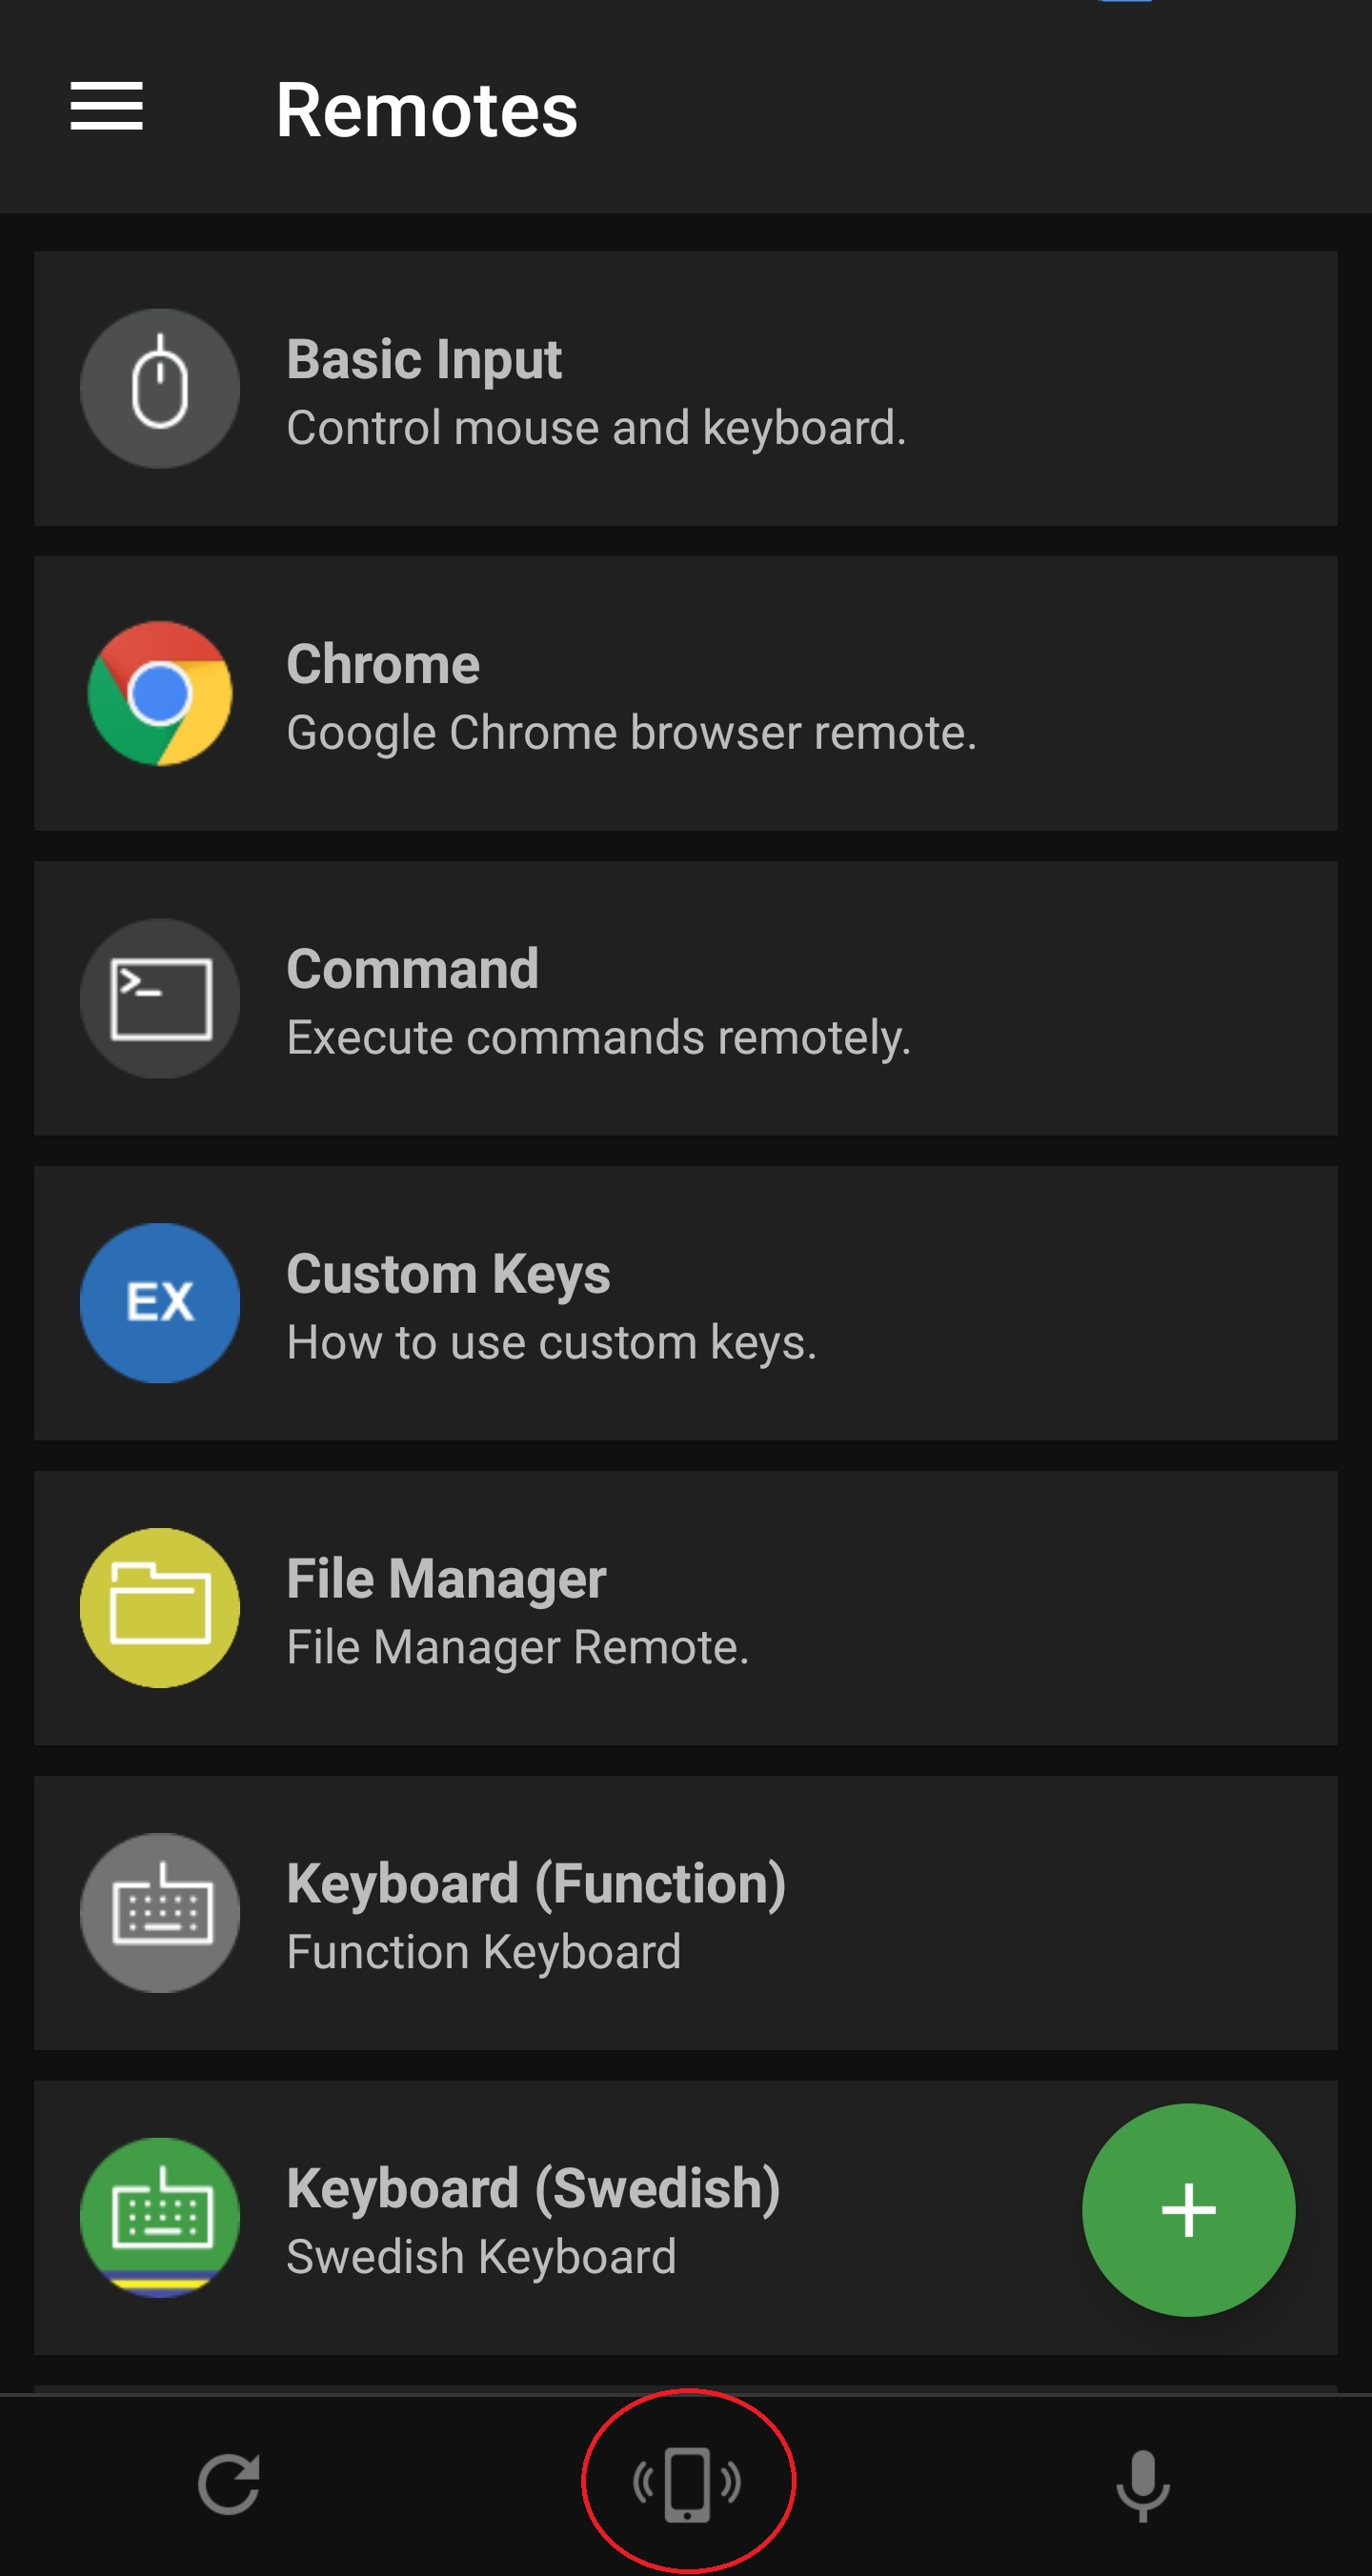
The next part is creating some URI strings (that fit your need) from the Unified Remote app to your computer. You press on the button in the middle of the lower menu, the Phone Trigger icon and choose Create URI String.
I used it to send CTRL+ALT+DEL strokes than the password and then Enter-press.

-
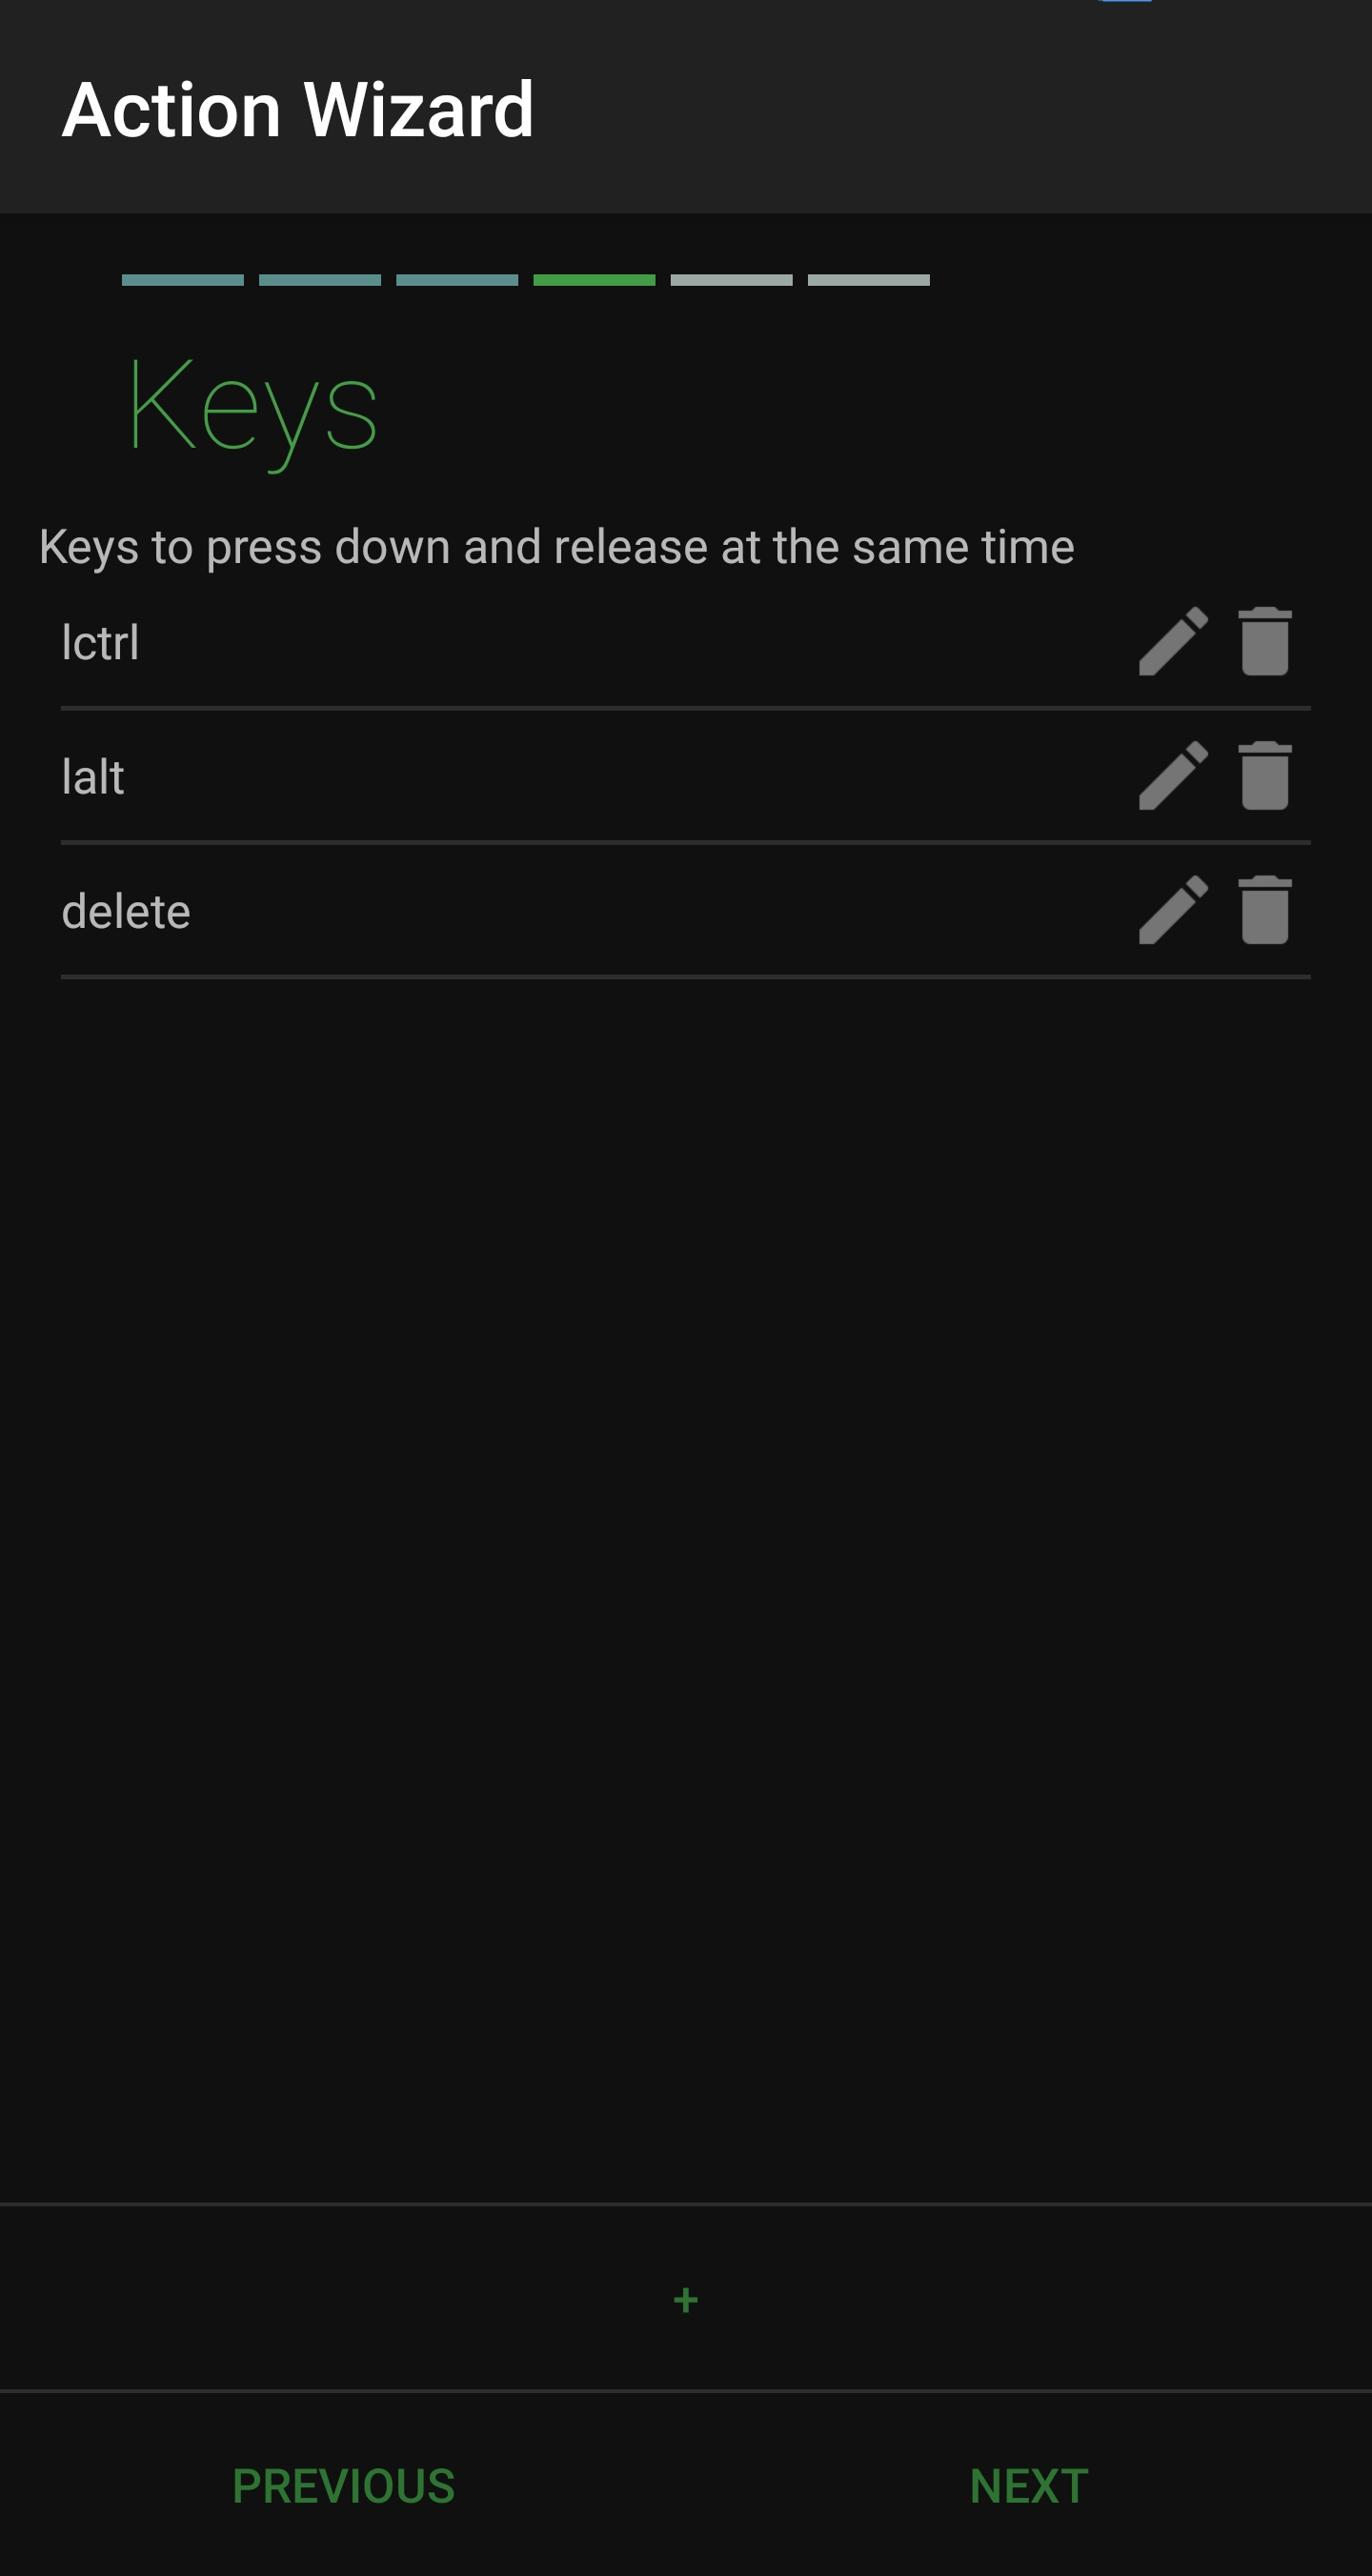
Net –> Browse URL. URL (send ctrl+alt+del):
ur://intent/remote:Core.Keyboard/action:stroke/extra:lctrl/extra:lalt /extra:delete/destination:YOURPCNAMEHERE -
Task –> Wait 2 seconds.
-
Net –> Browse URL. URL (send password): ur://intent/remote:Core.Keyboard/action:text/extra:%pass/destination:YOURPCNAMEHERE
-
Task –> Wait 2 seconds.
-
Net –> Browse URL. URL (send Enter-press): ur://intent/remote:Core.Keyboard/action:press/extra:enter/destination:YOURPCNAMEHERE
**And now to make all this happen at the touch of your implant. **
Thanks to miststlkr for pointing out that I forgot to write the most important part ![]()

Now that we are done with the task creation.
Go to the Profile tab in Tasker.
Press the big + button.
Choose Event.
Search for NFC.
Choose NFC Tag.
Here I recommend pressing the magnifying glass and scan/format your tag using Tasker.
This will format (remove all previous data) and add a text/plan record with “Tasker Test” content on the tag.
Do the same for the Content field and scan your tag through that.
When trying it out, by only adding the ID, I had also to choose which app I wanted to open the action with when scanning my tag.
I did not want that.
Now that we have added the tag recognition, we want it to do something, when leaving the Event Edit view, Tasker should ask you automatically which task you want to start, and then you choose the task we created above, in my case, Fingerprint Unlock.
TaDa!
After 4 edits, why not one more.
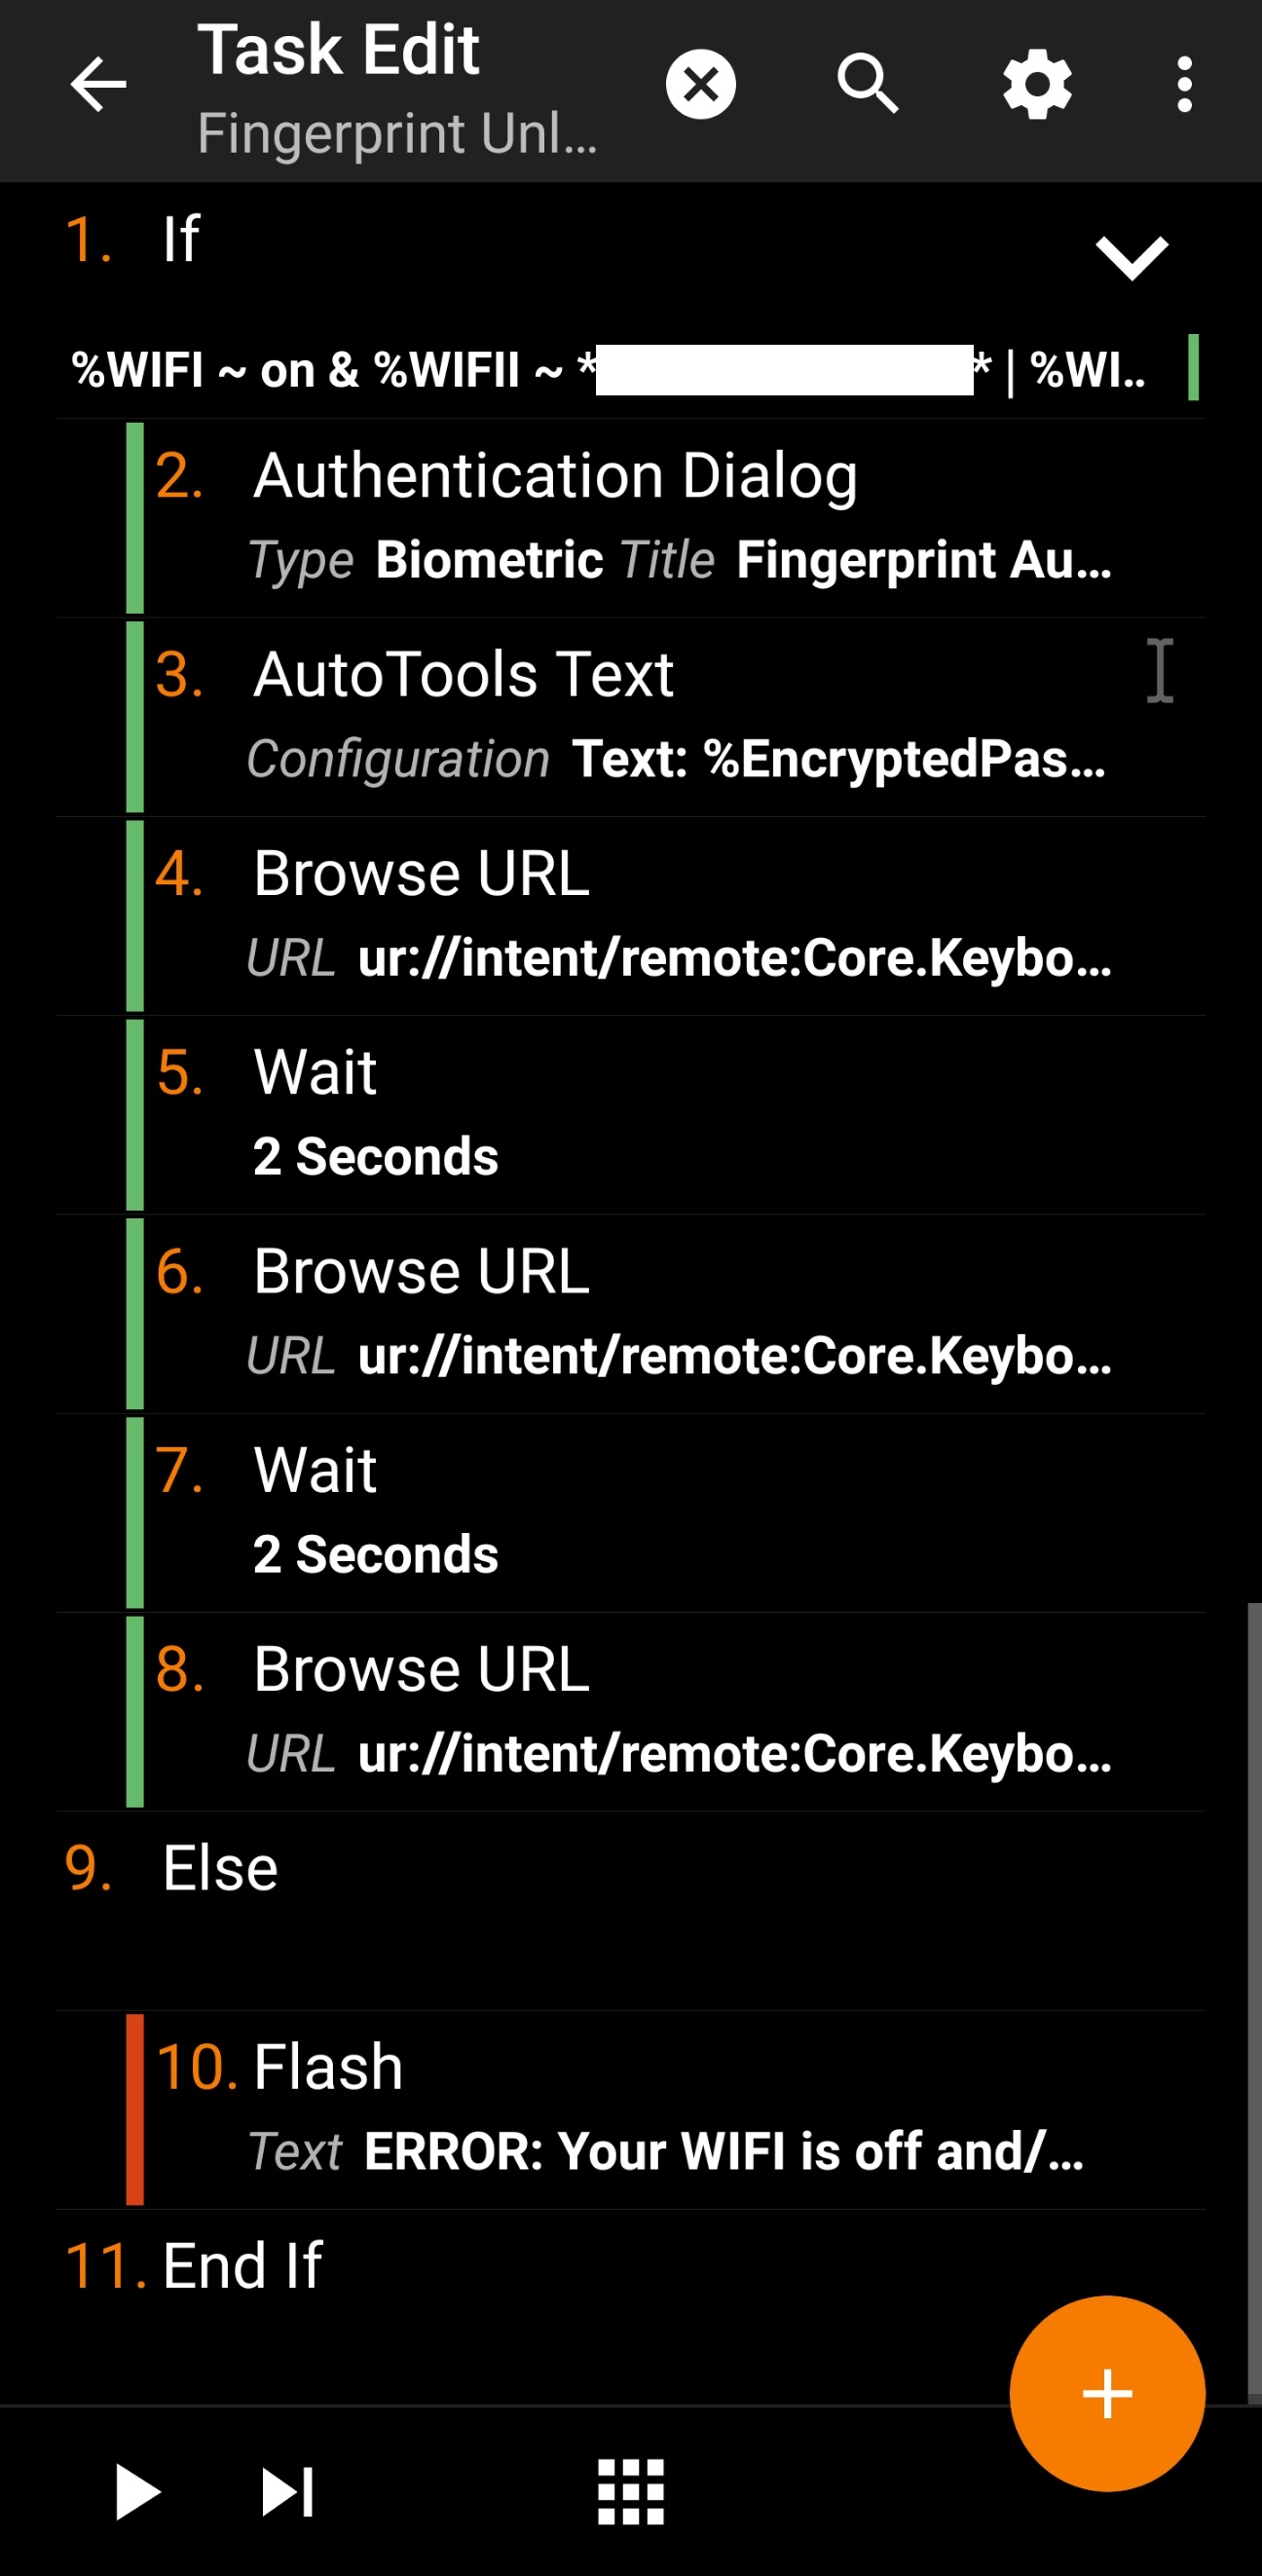
I don’t want my phone to do a biometric authentication check if I am not home and I happen to tap my implant. So I added an if-statement.
Go to the Fingerprint Unlock-task.
Pressing the magic + button in the Task Edit.
Search for IF and add it.
In the Condition, I wanted to check if my WIFI on the phone was on, and if yes, is it connected to my home network?
This is done like this (sometimes I am connected to my 5GHz for fun, that’s why I added both):
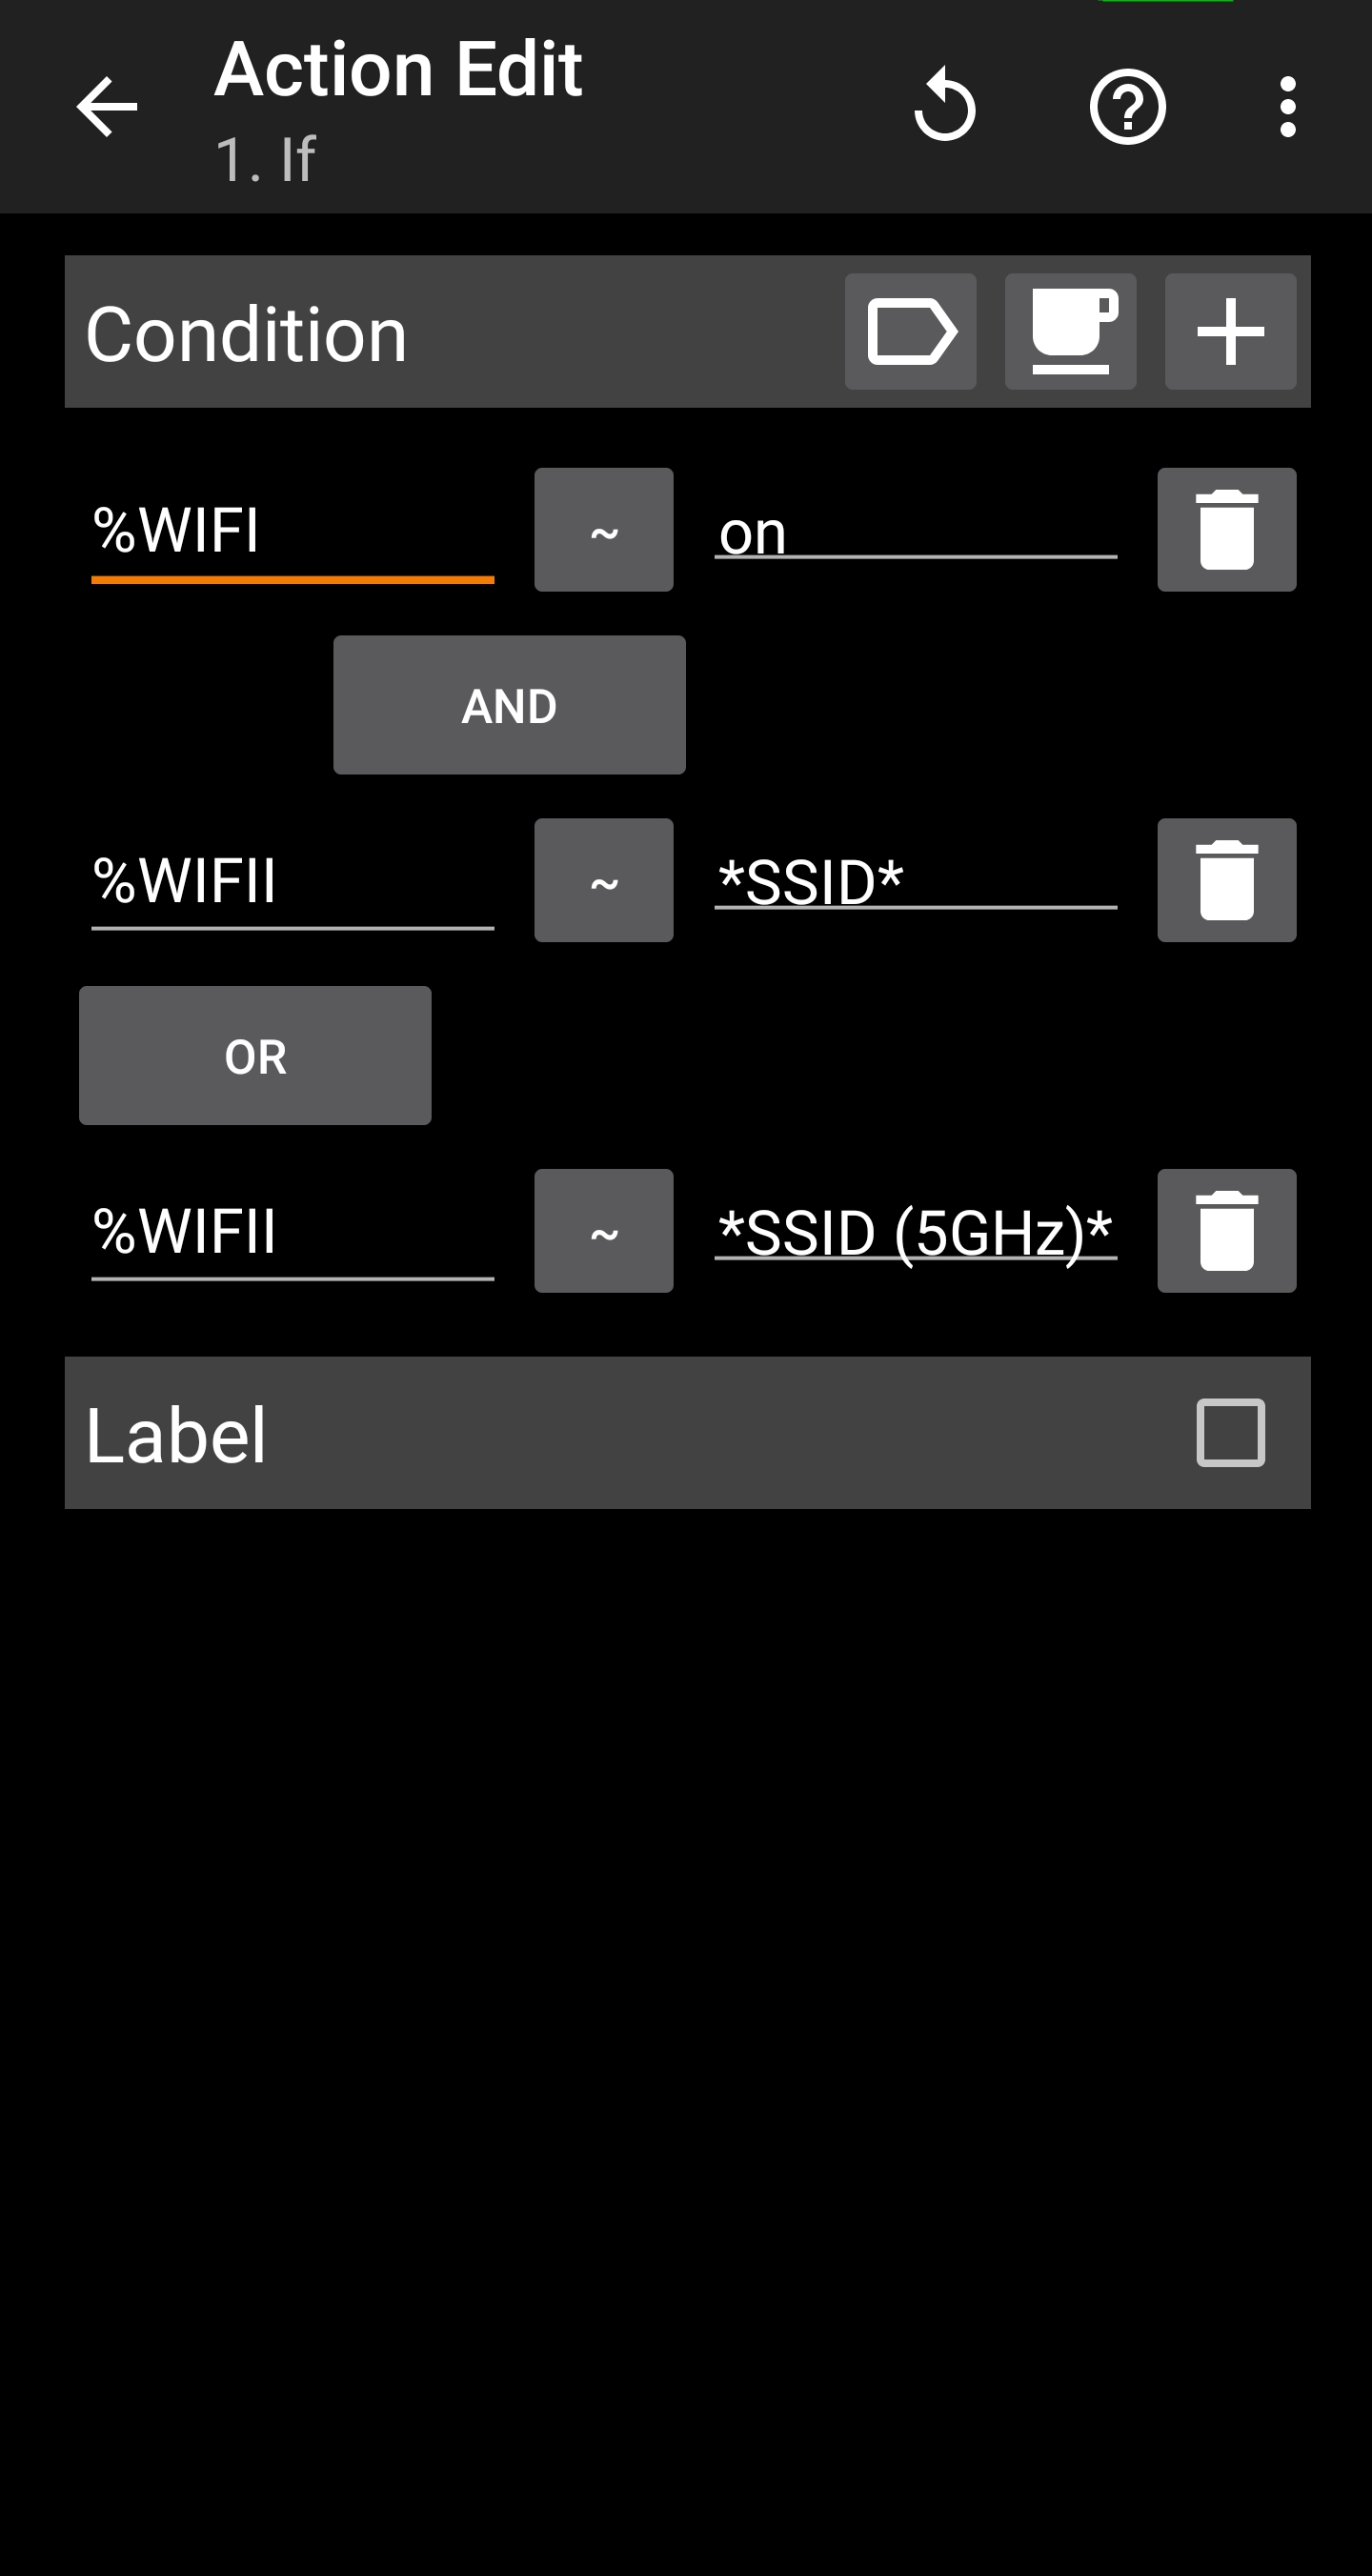
%WIFI, if your phone wifi is enabled it has on, any other state renders it as off.
%WIFII, shows info about the network like connection, IP, signal, speed and channel.
The " * " around your SSID name takes into account that there is other info but that we are only searching for this specific string.
" ~ " = Matches
Don’t forget to change “SSID” to your own network name.
And when you are done, and you go back to your Task Edit page, you be prompted with an Insert Action question:
- If
- If, End If
- If, Else, End If
I chose the third one (If, Else, End If), cause if the statement is not true, I wanted to show some kind of message. I added a Flash/toast message that pops up and tells me when/why the task fails.
You do this by:
Pressing the + button
Choose:
Alert → Flash
Add the message that you want in the Text-field.
Mine is:
ERROR: Your WIFI is off and/or you are not connected to your home network!
Go back to Task Edit page.
All the tasks are draggable and you can sort them how we want and we want all the stuff above inside the if-statement.
It should look something like this:
DONE!!
This is based on the guide found on the XDA-devs site, with few modifications, but I thought I would write my own version of it, even though very similar.
If you want to check out the XDA-dev one, then visit:
https://www.xda-developers.com/unlock-windows-pc-using-fingerprint/amp/
So Long, and Thanks for All the Fish