Having a file on the wedge with the password to type is a genus idea!
Rude words - The current USB Keyboard implementation I am using is not compatible with the USB MSC implementation. So I need to reimplement the keyboard portion in order to get the possibility of both of these working to make password changes/setup easier.
Still, it will be worth it in my opinion.
1 Like
Playing with layouts, I see 3 possibility:
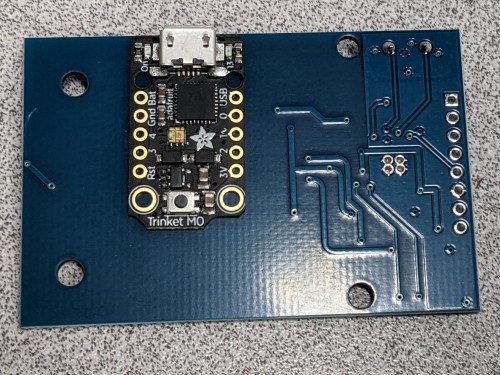
- on the bottom USB leaving the end (relatively safe and ergonomic)
- on the bottom USB facing the side (completely eliminate electrical failure)
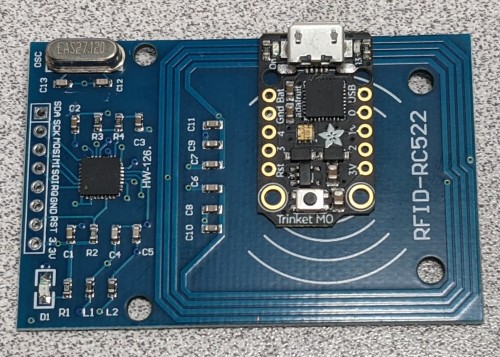
- on the top USB facing the side ( this is on top of the antenna but shouldn’t interfere, it will also be the smallest/tightest layout, but a bit more complicated in term of wiring …)

2 Likes
I will upload my current working version of the code tonight for you. This does not have any update the password functionality, it just acts like a keyboard wedge, looking for the string ZPKW followed by a password and then a null.
I am still trying to get a working version that allows for an easy up date using USB drive functionality.
That will probably have issues with the antenna tuning.
Awesome, thanks. I’ll give it a go ![]()
I’m worried about it with the “top mount” version, but the quick test I’ve done on my bench doesn’t show any issue with either of the “bottom mount” versions.
Once I have the proper setup, I’ll do more layout testing, definitely keeping an eye on range and interference.
Edit:
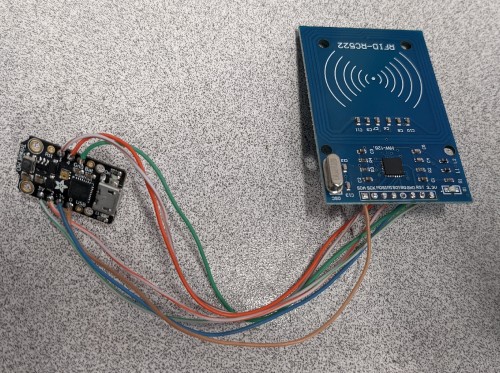
Have it wired up long to test placement:
2 Likes
OK, The Arduino sketch is available in a git repository…
Documentation is not there yet, but the short version is to follow the adafruit instructions for downloading the latest arduino ide, and setting it up for the trinket. Clone the sketch to your computer…
git clone https://github.com/zwack-am/KeyboardWedge.git
Open the Sketch in the arduino IDE and then hit the upload button.
You should then see some messages, and hopefully the sketch will be compiled and uploaded to your trinket. At this point it will be ready to act with a properly configured token.
Create a token with whatever writing tool you want to use containing ZPKWxxxxxxxxx\0 where xxxxxxxxxx is your password you want typed and \0 is the null character. Open an editor, and with the editor window open and selected touch your token to the reader and you should see your password appear followed by a return.
More work is still needed to add more card types (and manage things like sector trailers) and to allow the wedge to update the password or create new tokens.
Please let me know how things work for you.
3 Likes
Thanks for posting it ![]()
Got it working, and all the earlier layout are working, I don’t see a difference of range from one layout to the next.
Will start working on enclosure soon.
Thanks again to @Zwack for the code
2 Likes
You are welcome.
At the moment you do need to create the token manually. I am using a Proxmark3 to write the password string into a block (mine is 10 characters, if it is longer than 11 it needs to go into multiple blocks)
The following command writes ZPKWpAsSwOrD followed by a null and then yyyyyy is 3 bytes of padding, to block X. You would need to replace X and yyyyyy to get this to work.
hf MF wrbl X a ffffffffffff 5A504B5770417353774F724400yyyyyy
If this ran over into the next block there is no header needed, once it has found the header it does just read consecutive blocks until it finds a null character.
I’m still trying to add a password set mode.
1 Like
New version uploaded…
Changes:
-
An array containing UID/Password pairs has been added, if the UID matches one in the array the related password is output. If not it then checks the tag itself for a password stored as before. You do not have to use this feature.
-
The dotstar on the Trinket (RGB LED) slowly changes colour the entire time. This is pointless, but the dotstar is there so why not use it?
I still need to see about adding more card types (and testing them), a mode to set/change the password on the chip, change the status of the red led on the Trinket depending on what the software is actually doing.
2 Likes
I’m not sure how many people (if any) are interested in this.
Tonight’s version changes the built in dotstar so it shows white normally, when a token is scanned it will change colour depending on the action taken…
Green means that the wedge found a password on the token itself.
Blue means that it found the UID in the table of UID password pairs.
Red means it didn’t find either so it just outputted the UID. This means that with an unknown token this acts the way the KBR does.
Apart from the colour signalling, the other new change is the third mode where the UID of unknown tokens that don’t contain a password is typed out.
5 Likes
Does this have any difference in functionality to the one @Vicarious set up?
1 Like
Yes. I wasn’t aware of the unloki but it only provides two of the three modes that this has.
The original mode for this version was to read the contents of the chip looking for a header, if it finds the header then it outputs from there to the next null character as the password. In this case any of these devices can be used with any number of chips with no special prep of the device.
Your password is not stored anywhere other than on your chip.
The other thing is that this hardware is cheaper than an unloki. The Arduino is about $9 and the RFID reader is $5. There is no case yet, but that would hopefully be a 3d printed case design that would be freely available.
I would like to add an extra mode if I can where the device itself can be used to write a password out to a chip allowing for easy updating.
I hope that helps you understand the additional mode in this device. Although as I didn’t know about the unloki this was developed entirely independently.
Edited to add:
This is not a commercial product, I am using off the shelf hardware modules combined with software I wrote which has been placed into the public domain.
4 Likes
This is an awesome evolution and works great ![]()
Can I use the “soon tm” logo here?
Got the first version printed this morning, should have something usable in a week or 2 …
Once it’s ready I’ll release it into the wild.
And we cannot thank you enough for this!
I’ve been looking at wedges and other devices, but non fitted what I wanted them to do … All did parts, but this does it all. And you can get in the code and tweek what you need for a perfect fit (if you want to, but why?)
3 Likes
Wondering if these projects can be merged, into a open source DIY united project.
I didn’t want to name drop, but Soon™…
(Btw the ™ is ( tm ) without the spaces)
This does not include a Bluetooth module. It might be possible to swap out the trinket m0 for a different controller (maybe the Adafruit ItsyBitsy nRF52840 Express - Bluetooth LE) and add Bluetooth functionality.
The current version could be battery powered but as it is pretending to be a USB keyboard what is the point?
The itsy bitsy would add a further $11 to the hardware cost, but if acting as a Bluetooth keyboard is important it is an option.
Great work! I will build this. Just need to get the hardware. Any reason you are not using the much cheaper and more available esp8266?
A couple of reasons…
-
I had a trinket m0 and a couple of Digistump Digisparks available already.
-
The Trinket has built in hardware USB support.
-
I have no ESP8266 kicking around.
1 Like
Thanks for sharing this interesting project @Zwack I ordered a trinket m0 this morning to give this a try, I already have a RC522 here lying around not being used. Starting to learn Python as well, so the m0 could be interesting to me on a few fronts.
I’m looking forward to trying your code and will post up results. I have a xEM/125kHz & xNT/13.56MHz available to me for testing.