This is a brief explanation of how you can unlock your car with your LF implant.
Okay to premise this I did the project with a 22733524 keyfob which to my knowledge is only for Buick LaCrosse 2008-2011.
Supplies you will need
- xEM Access Controller V2
- (In my case) 22733524 keyfob
- Soldering Iron and Solder
- 12v DC cable or 12v Power supply
- Power converter for cigarette lighter in car (only if you aren’t wiring it to the battery)
- Tape
Step One. Configuring your xEM AC
To get started, the first thing you will want to do is program your master tags. To do this, with the power off set jumper S2 to bridge pins 1 and 2. Next connect the black wire to ground and red wire to +12v DC power. You will see the red and green LEDs on the board blink in an alternative pattern. This means it’s ready to read the first EM tag, which will be the ADD master tag. Tap the EM tag you want to be the ADD master to the antenna. You will get a beep and the LEDs will begin blinking together in unison. This means the controller is ready to program the CLEAR master tag. Tap the EM tag you want to be the CLEAR master tag to the antenna. You will get a beep, and red LED will go solid. At this point, programming the master tags is complete. Remove power from the controller, then replace jumper S2 to pins 2 and 3.
Step Two. Adding your xEM or NExT
Scan the add tag and the green LED should start blinking. Secondly scan your implant or RFID fob and you should hear 3 beeps. Lastly scan the add tag again.
Step Three soldering the xEM AC
Disclaimer: I am not very good at soldering so take my advice on this very very lightly.
If you’re doing as I was using a 12V DC cable with power converter inside the car. The first thing you’ll need to do is strip your 12v DC cable and expose the live and ground of the cable (I used scissors). Remove your S3 jumper from the xEM AC and then touch the red wire to the live of you cable and the black wire to the ground. The Red led should be solid, if it isn’t you’ve either got them backwards or a bad cable. Now solder your red and black wire to their respective ends of the cable. Make sure* that the two ends of the cable do not touch it will slowly fuck shit up. After you’ve soldered them wrap em up with some electrical tape for good measure.
Step Four. Soldering your keyfob
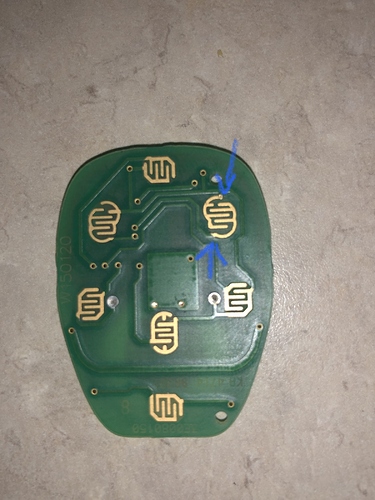
There should be a small indent in the plastic of the fob where you can get a tool or your nails under. Use this to pry around the edge and then drop out the PCB there shouldn’t be anything attached. Remove the battery and flip it over to reveal the side with the gold contacts.
What you want to do is solder the white wire of the xEM AC to the left side gold contact (top arrow) and yellow wire to the right side (bottom arrow). Be careful not to let the yellow wire sit across both contact otherwise your car will continually unlock. Once again wrap up with electrical tape for good measure, if you’re good at soldering that isn’t necessary.
Step Five. Powering
I chose an unconventional method of powering it so if you’re going to connect it to your car battery I apologize I can’t help.
Take your power converter and plug it into the cigarette lighter of your car and plug your 12v DC cable into it. Scan your implant or fob and if everything has gone right up to then your car doors should unlock.
Place your antenna in the desire position and voila.
S/O to @Pilgrimsmaster @Devilclarke @turbo2ltr and @ODaily for the help, I couldn’t have done it without them.
If at any point you the reader has trouble or misunderstand something just let me know and I’ll do my best to help out.

