I’m gonna leave this here for reference if someone wants to do the same thing I wanted to do.
This is part of my unfinished smart doormat project: my idea was to use a long-range LF reader as a doormat to open my Yale Doorman V2N smartlock with my foot implant.
The Yale Doorman V2N has a built-in NFC (Mifare Classic) reader, but it’s a bit finicky, and it requires exact cloning of the really expensive genuine Yale tags (see here for technical details). It’s annoying to use with the M1k implant in my hand. I’d rather use my easy-to-scan foot implant to open it. Not to mention, it’s easier with my hands busy with groceries.
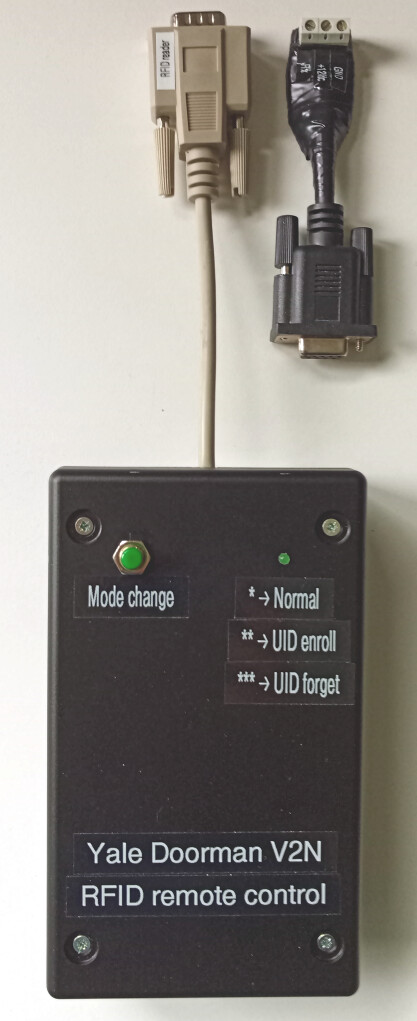
If you want to remote-control the Yale Doorman V2N from a computer, a Raspberry Pi or an Arduino, you’ll need:
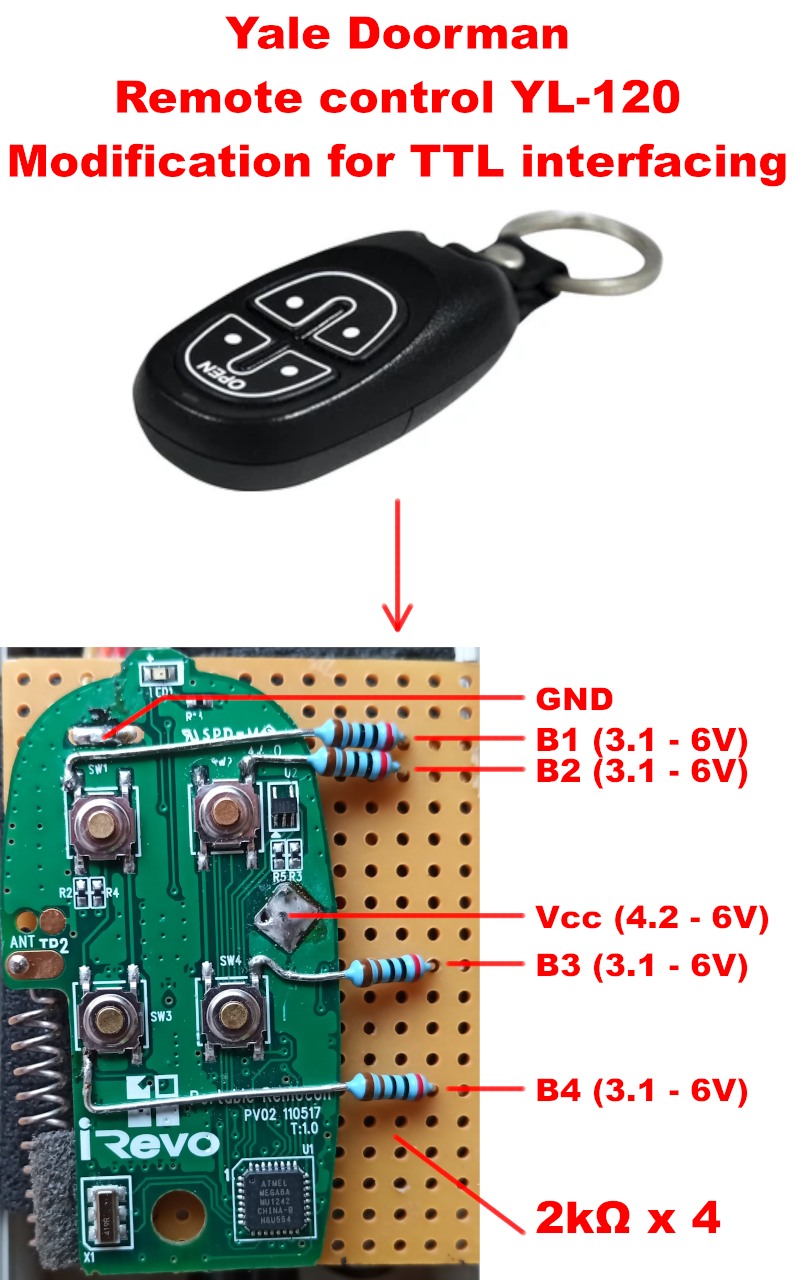
The fob only draws 30mA, so you can even power it with a healthy I/O line, provided the voltage doesn’t drop below 4.2V.
As specified in the Yale manual, to enroll the fob, B1/B2 and B3/B4 need to be depressed at the same time when the lock is waiting for a new fob to enroll. So you’ll need to take care of this in your code. Once enrolled, the lock can be opened by strobing B1 only.
I have an Arduino Uno on order for this project, but by the time it gets here, it’ll be too late and I’ll have run out of time. So most likely this project will never be completed. But hopefully this will help you if you have a Yale Doorman V2N and you want to remote-control it too. [It’s done - see below]
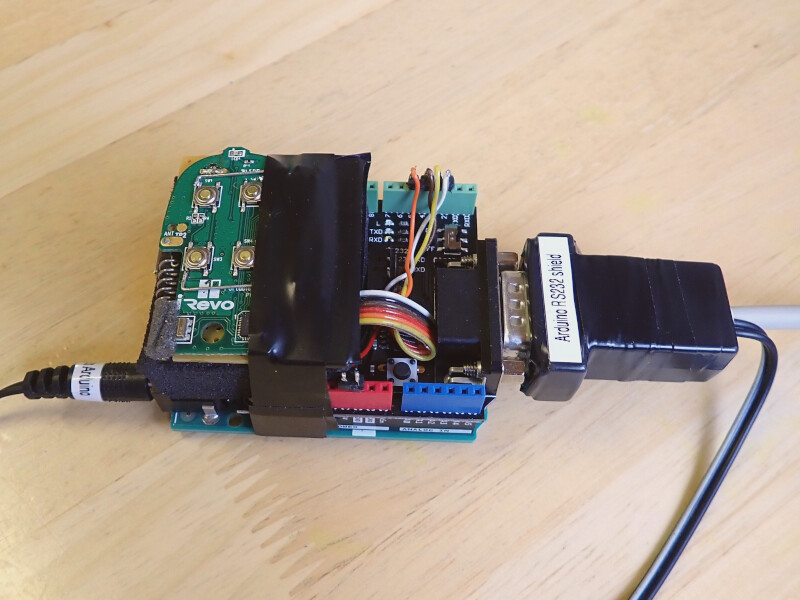
The Arduino is all connected up and programmed. I now I have me a door lock that opens with my long-range RFID readers. Now all I gotta do is find a box to stuff it in and something to disguise the reader as a doormat. I’ll hit the hardware store tomorrow. Hopefully I’ll be able to post a schematic and some code soon.
Looks like I’ll have made this thing in time after all
I haven’t turned it into a proper doormat yet because I realized I overlooked two things:
I rent, so I can’t drill a hole through the door or the door frame to pass the serial cable through, and Finnish doors have such a tight fit to keep the winter temperatures out that I can’t even pass a ribbon cable under the door. And I sure as hell won’t power a high-power reader on battery.
I’m not sure the reader will survive temperatures under -20C this winter. It’s supposed to be installed outside (those readers are typically used to open car garages) but cold temperatures have a knack for destroying even the best built equipment, and this is made in China…
So I need a rethink. Maybe I’ll install it vertically on the inside face of the door: it’ll most certainly read my foot implant through the door, but maybe it won’t through the door and through a winter boot.
Anyway, it works. Here’s the Arduino sketch if you want to build your own:
Made a nice box for it - and a breakout cable to run 3 wires to the reader outside, for when I figure out how to run the wires through my door without ruining the weatherstripping:
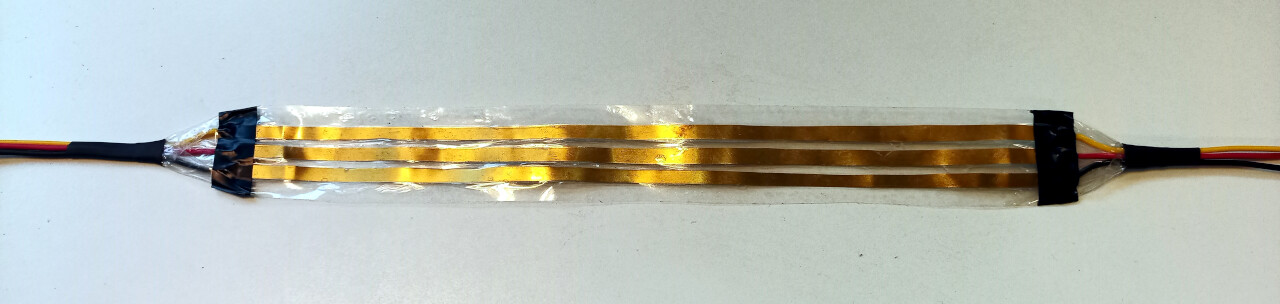
I made this custom high-strength, ultra-flat ribbon cable to pass the power and Rx line under my door without damaging the weatherstripping, out of brass sheeting and clear tape:
I’ll see how that goes when I’m back home tonight. I think it’ll work, but there’s a fair chance the missus will yell at me for adding an eyesore to the house.
One thing I did to get around this at my old house was to put the reader in the wall next to the door with a nice plate.cover and frame (pass the wife test). It was situated vertically over a power socket on the inside wall. I then ran power down to the socket on the inside wall and put an inline adapter to drop it to 12v and run the reader.
To communicate authenticated tag events I made the reader power a small electromagnet that I embedded into the door frame. Ok the otherside in the actual door I put a security magnetic reed switch so when the door was closed they lined up perfectly.
When I scanned a tag the electromagnet pulsed which closed the reed switch which “pushed the button” on the door lock. It worked well and no visible wires and I couldn’t even get my strongest magnet to trip the reed sensor from outside because the field from outside was perpendicular to the switch mechanism and couldn’t pull it in the correct direction to activate it.
Clever! But conceptually, from a security standpoint, that’s all shades of wrong, because the entire door opening decision logic is bad-guy-side. But of course you know that.
If I wanted to do that, it would be very easy, since I’m repurposing a Yale Doorman remote control: I’d simply put the Arduino + Yale remote + reader outside and power everything with the garden mains outlet. But… it feels wrong somehow. Then again, it’s entirely psychological, since I leave the shed with the power tools and everything, my car and my velomobile open year round. There ain’t nobody out here in the boonies, and the wild hares never tried to break in. The only thing that’s locked is my front door, but I might as well leave the house open too really
And of course, I’m not sure how the Arduino would fare when the temperatures drop below -20C, but I doubt it’d like it. So I’d rather leave as little as possible exposed to the elements.
The strip passes the missus test, provided the end of it enters a small junction box with a large square O-ring that contains the connection to the reader. If I paint it black and screw it against the black board under the door with two very small diameter wood screws, there’s about an inch of strip that’s visible between the door and the box. The missus don’t mind. The only concession will be two tiny holes in the board for the junction box screws, something I believe the house’s owner won’t notice when I leave.
yeah totally… it’s just the context… personal home reader… sealed panel with reader behind… yadda yadda … breaking a window in the back of the house would be easier and less conspicuous than wrenching open a panel and fiddling with wires on the porch… but yeah… not good security design, just good enough for the scope.
This is really the most important bit, so congratulations on a well considered design!
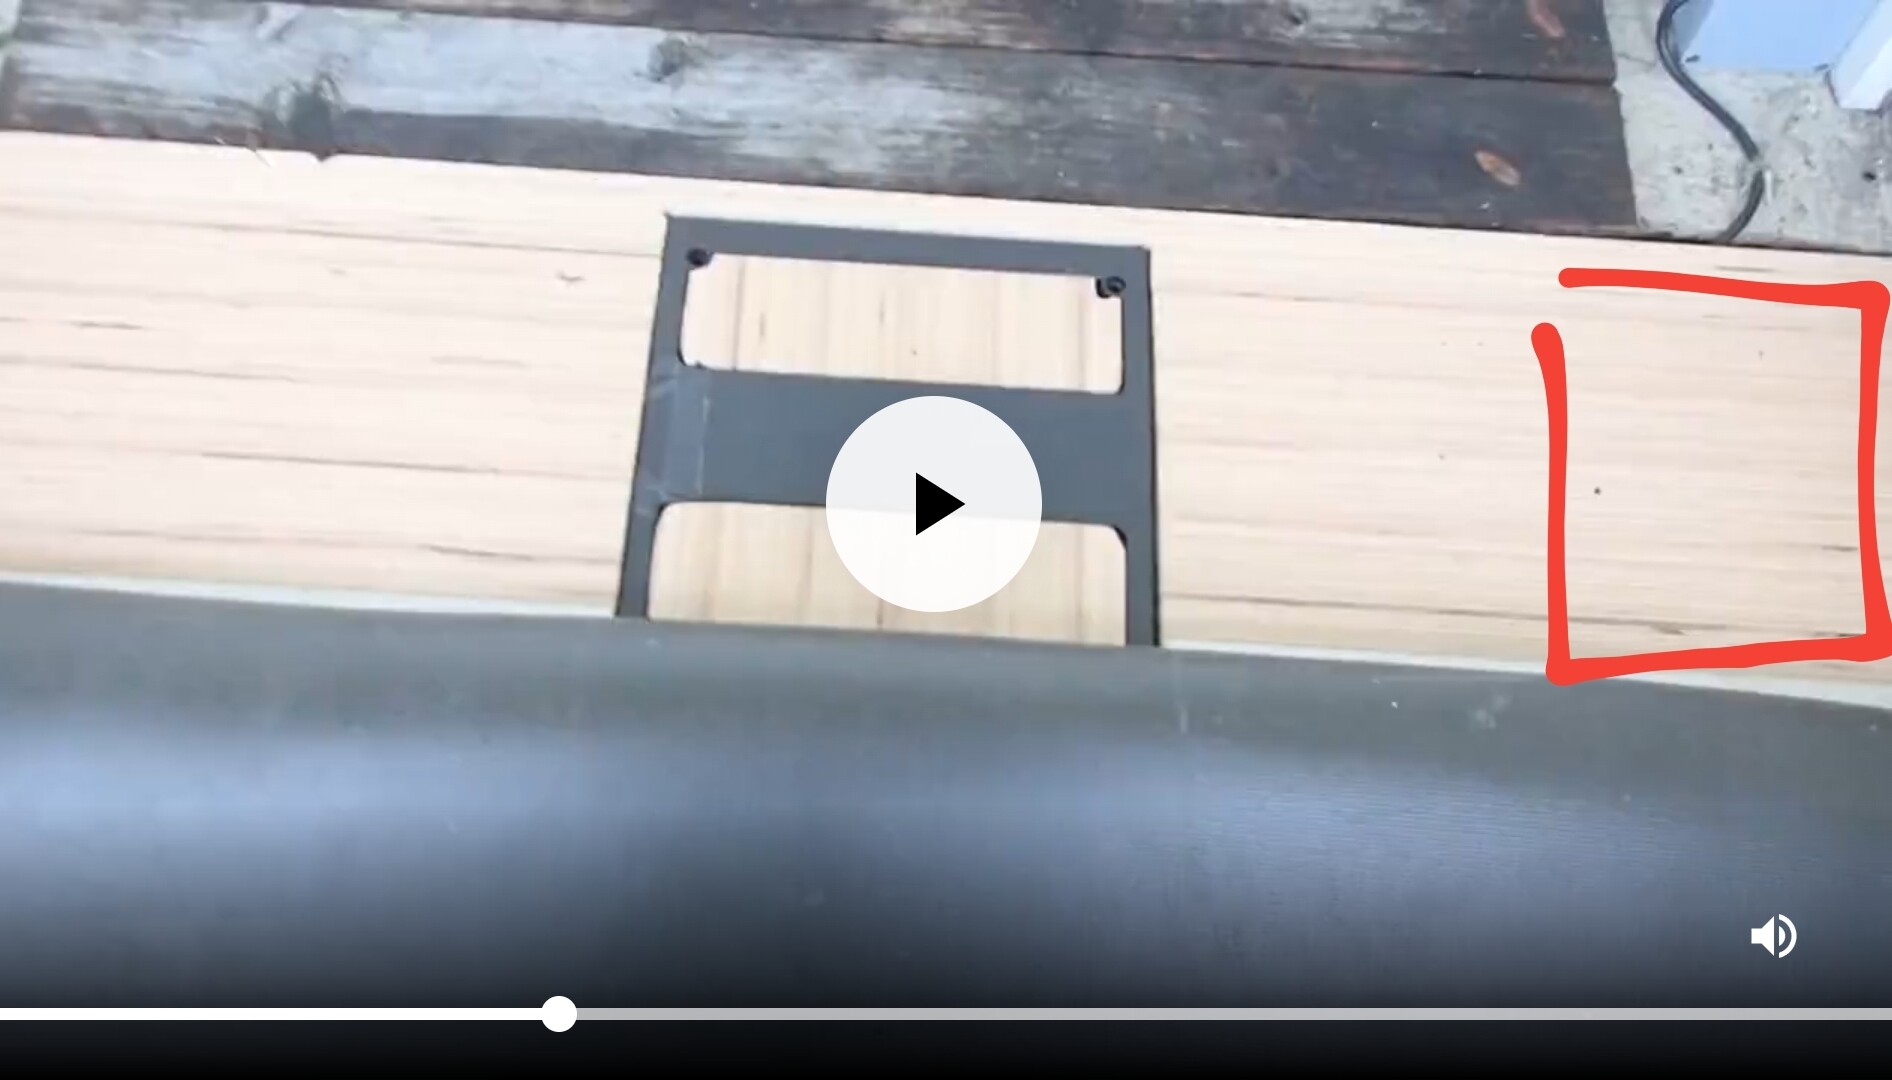
There it is at last: the completed RFID doormat. Check it out:
Not a single screw was used. And it doesn’t look half bad I reckon.
However, there is a bit of a problem: the door opens whenever I step on the doormat, including crucially when I step outside. It’s not exactly useful to open the door when it’s already open each time I get out of the house. I need to train myself to step out with my left foot first - which is surprisingly unnatural since my door is left-hinged and opens outwards - otherwise I’m going to go through the lock’s batteries like no tomorrow.
Could do. But the setup allows me to do exactly what I intended it for: explore how a new kind of setup integrates into my routine as an implantee. I didn’t anticipate this at all. it’s interesting to me. In retrospect, it’s obvious that it was gonna happen. But that’s the power of hindsight.
I’ll give the training and muscle memory a spin first. There’s no reason why I couldn’t train myself to step outside left foot forward.
Move the reader to the far Right.
obviously test range to find the optimal position, but I think that would be a more natural position for you and you shouldn’t even have to think when you approach the door, and when you exit it shouldn’t matter…
Have you tested with your snow boots on yet?
Regardless, great thread, great hack and great project.
An awesome solution for a hands free, keyless life.
Thanks for sharing
I measured the width of the square cutouts inside the reader, cut 2 filler blocks of that width, only to find out they were too small - one of them because I had measured the width at the center of the cutout which isn’t square but a sort of badly deformed pincushion, and the other because, funnily enough, the two cutouts aren’t symmetrical! I assumed there were, but thanks to the magic of Chinese engineering, for some reason the center “pillar” isn’t in fact at the center but 1/2" off to one side.
I could have used the two undersize filler blocks as-is of course. The gap wouldn’t be a problem. But I wanted them to be press-fit inside the reader - just like the reader itself is in fact press-fit inside the square hole in the board: you can lift the entire assembly and everything stays in one piece without a drop of glue.
So I had to recut two more filler blocks, and the only scrap left large enough to contain the two pieces had to be oriented that way
It’s not wood grain by the way. The board is made out of 60 cm thick glulam cut through the lamination to create a visual effect. The board is sold as some sort of fancy material to make modern furniture out of, and it’s in fact rather expensive. But it’s the only piece of 35 mm thick wood I could find at the hardware store that fit inside my bicycle trailer. I figured cheaper wood would be more expensive after I factored in the diesel to go get it with the car. Not to mention, the car’s battery is flat because I haven’t started it since March…
I thought about putting it off to the side. But I wanted the door to open while I wiped my feet before stepping inside. In the video I do it deliberately, but I kinda wanted it to happen automatically as part of my normal get-inside-the-house routine. Maybe it wasn’t such a great idea and a dedicated movement to open the door is better. I’ll find out as I use it I guess. At least for a little while…
I haven’t but I expect it’ll work, because the reader works even better than it normally does.
I was afraid the wood would detune the antenna and kill the range, what with wood being full of water and all, but it seems to be having the opposite effect. I assume the antenna was out of tune to begin with and the wood re-tuned it to the correct frequency by happy accident.
I did some “serious” range testing with various shoeware I happen to own - including a steel-toe safety shoe, because in that particular case, the xEM is surrounded by metal. As you can see, it works like a champ:
Happy weekend moment: I put a T5577 card in my mom’s shoe and she’s delighted because now she can open the door without letting go of her walking frame. It was her idea too
Hey, this thing might actually have potential for the disabled.
Yes those are Leguanos. I just checked actually, because apparently I bought them somewhere years ago and I never wore them. I found them a few days ago in one of my unopened moving boxes.
Apparently they’re mine because they’re my size, but I just don’t remember buying them. I think I must have bought them when I was still working for a certain company in Belgium that had an anti-barefoot dress code, before I found the Paleo chain-mail shoes I wore there. And then I quit wearing both when I left that company.
Thanks! Yes, I’m pretty pleased that it ends up being more than just another hacky project for my use only.
And I now know the reader under the doormat works fine in low temperatures - while the Arduino is toasty and comfortably 45C warmer on the other side of the door
The reader is a parking garage thing, so I expect they designed it to withstand any sort of weather. But I’m glad I chose to keep the Arduino indoor, because it’s quite nippy out there today and I doubt it would last very long.