BEGINNERS GUIDE TO IMPLANTS ![]() & BECOMING A CYBORG
& BECOMING A CYBORG ![]()
The purpose of this WIKI is to explain the BASICS to anybody looking into getting their first implant in a clear, concise, condensed WIKI.
The “bite-sized chunks” ![]() are to simplify the overwhelming amount of information, and provide you with an abridged version… One topic at a time
are to simplify the overwhelming amount of information, and provide you with an abridged version… One topic at a time
ABOUT & TERMINOLOGY
There are 2 MAIN frequencies
Low Frequency ( LF ) 125 kHz
- A lot of access systems use this
High Frequency ( HF ) 13.56 MHz
- Some access systems use this and also NFC capable Phones
With each frequency, there are multiple Technologies and even more protocols that are too complicated to get into here ( WIKI - Frequency Technology and Protocols explained Coming soon )
There are 2 MAIN Types of implants
x Is an injectable Chip
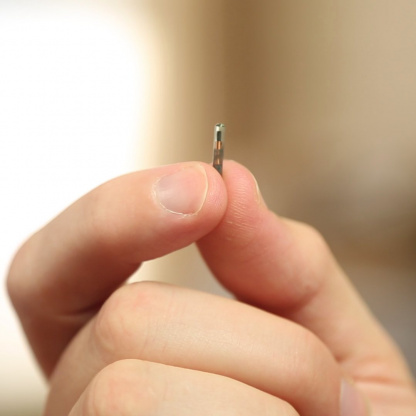
- These are the x-Series implants about the size of 2 grains of rice end-end, preloaded into a sterile syringe
Pros
easiest to install
Cons
Antenna not as good as Flex so read range not as far
Flex is a flat flexible implant
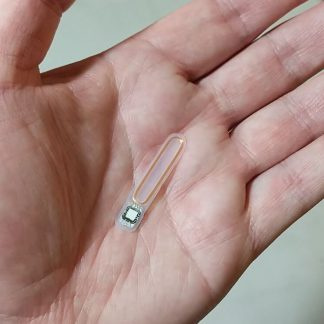
- These are the flat HF implants that have better-performing antennas
Pros
Better read range than x- series, capable of more powerful processing
Cons
More space required to install so fewer options than x-Series chip and requires more skill to implant plus a bigger hole required
.
CAN I PAY WITH MY IMPLANT
In the conventional sense of the word Payment, and what you are likely meaning, the answer is
NO
HOWEVER
There is progress in this area, and it is going to happen in the not too distant future
Keep an eye on the Product announcements for Vivokey APEX ( on release it will be fitted for payment, but not with)
UNTIL THEN
Payments
.
WHAT IMPLANT SHOULD I GET?
This all depends on YOUR own individual use case
- What do you want to do?
- What Frequency does it operates on ( normally it will either be low Frequency (LF) 125kHz or High Frequency (HF) 13.56MHz, but sometimes both. My work is capable of both but only operates 125kHZ )
- The easiest way to determine this is with an RFID Diagnostic Card
- What technology does it use? ie.the protocol it is running to find the compatibility with the correct implant. ( these are all the words and numbers you would have seen [NTAG216, ISO14443A, T5577, Mifare, Desfire, Hitag etc. ]
If you need help with this, look on the Dangerous Things Product Matrix to find out the compatibility for system to implant
Or the Google Sheets Compatibility Matrix - If you get stuck, search the forum to find your answer
- But if you really get stuck, make a post and ask the question, remember you will need to provide us with as much of the information from above as possible. where possible take a photo
 of your Card / Fob and Access panel.
If it a specific card or fob you are trying to “copy” try using TagInfo App or similar and THIS guide to share the results so we can help you determine what implant (if any) will “do the job”
For more detailed information check out Amals Info/FAQ thread Which chip should I get?
.
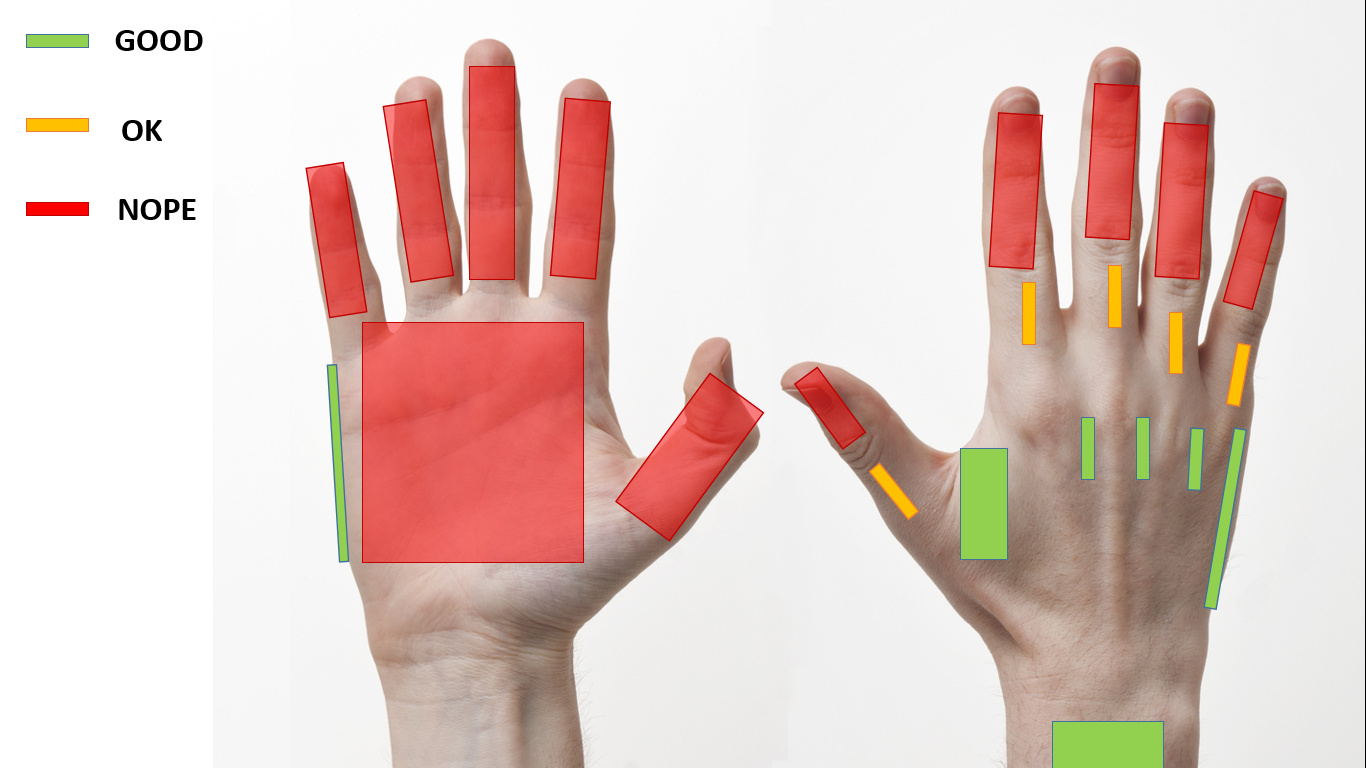
WHERE **CAN** I PUT IT
NAMING CONVENTION FOR IMPLANT LOCATIONS
Taken directly from Amals DT Info naming convention for implant locations in the hand
First, a prefix of L or R for Left or Right. Next, a number to specify the position.

0 - The triangle tissue between the first metacarpal bones of the thumb and index finger
1 - Between first metacarpals of the index and middle finger
2 - Between first metacarpals of the middle and ring finger
3 - Between first metacarpals of the ring and small (pinky) finger
4 - Just outside the first metacarpal of the small (pinky) finger
5 - The outer edge (knife edge) if the hand
6 - On our around the second metacarpal of the thumb*
7 - On our around the second metacarpal of the index finger*
8 - On our around the second metacarpal of the middle finger
9 - On our around the second metacarpal of the ring finger*
10 - On our around the second metacarpal of the small (pinky) finger*
More positions may be added to this list in time. Fingertips should be fairly self-explanatory (I have a magnet in my left middle fingertip).
- These positions are mostly listed for consistency, but they are very uncommon implant locations due to their relatively small size and are typically not suited for implantation for that reason.
HANDS & ARMS
- *The fingertips have been used for the xG3
Here is an example of Forum member @Vicarious implants locations he has kindly offered to share with us (22 at time of update Feb 2020)
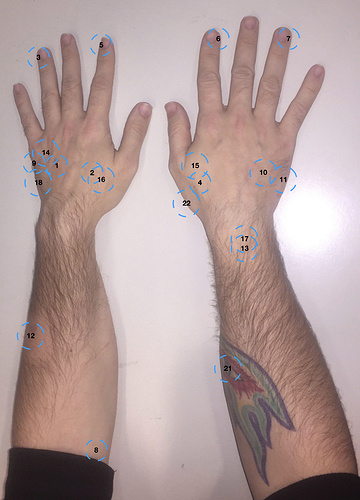
Location Key
1: neodymium magnet 2x1 mm with Sugru coating
2: xNT
3: m31
4: xEM in HID mode
5-7: m31
8: xBT
9: xEM in EM mode
10: xNT
11: flexNT
12: VivoKey Flex One (beta)
13: xM1 (the original Mifare Classic, without CMB)
14: xM1 (I had the original xM1+, but I’ve replaced it with the new and improved xM1 with CMB)
15: xLED LF
16: xLED HF
17: VivoKey Spark 1
18: VivoKey Special project - contactless payment implant
19: xG3: left tragus (not in the photo obviously)
20: xG3: right tragus (not in the photo obviously)
21: xLED LF
22: xG3
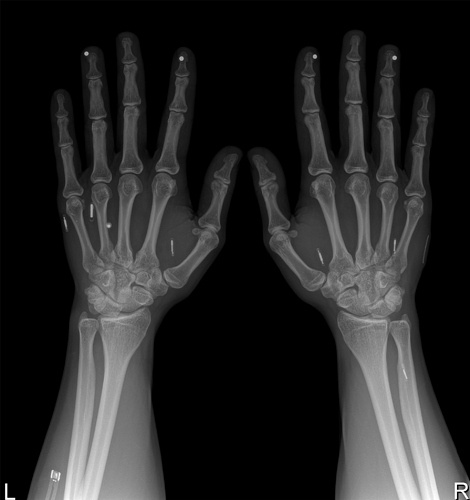
And an xRay when he ONLY had 14 ![]()
HERE is a link to @Vicarious YouTube channel using some of his implants
OTHER PLACES
ARMPIT
Temperature sensing implants (ex: xBT) need to be near the core of your body. Usually installed below armpit
HIP
This is a special chip pre-loaded with a Swiss Bank Account


- This sale is RESTRICTED for sale to Spies
 only
only
LEG
Be very careful doing ANY installs in the legs. Bleeding from the procedure is more dramatic in the legs and may require more aftercare to heal properly.
EAR
Magnets (ex: xG3) can be installed near the ear in front of the area called the “tragus”. Be very careful with the initial insertion angle on this install to avoid piercing jaw muscle.
This was just a quick overview to give you an idea, however for a more comprehensive list, check out @NiamhAstra WIKI Implant Sutra - An index of implant positions that have been discussed and/or tried
.
WHERE **SHOULD** I PUT IT
Planning is an important part of the process to make the best decision about YOUR specific use case scenarios,This will dictate WHERE you should implant.
Here is a use case scenario for somebody that purchased an Ultimate upgrade kit
MAX bundle:-
NExT
Spark 2
xLED
with the following requirements.
- Wants to access work doors and parking garage barrier arms ( using lf NExT - xEM)
- Wants to share contact info with business associates (NExT - xNT)
- Wants to show off glowing LED when scanned (xLED)
- Wants to have a secure digital identity profile and be future-ready ( Vivokey ) plus access to house door lock with a compatible reader ( this can also be done with the NExT - xNT)
- Wants to tinker on projects using an xEM controller ( using lf NExT - xEM)
![]()
For THIS scenario, my suggestion would be:-
LOCATION
In the webbing between thumb and forefinger ( Easiest to implant and pretty easy to use )
WHAT & WHERE
Now you need to decide what goes where; This depends on how you plan to use them!
The NExT will PROBABLY be the implant you use the most,
The (2 in 1 Chip) 2 x parts being:-
The xNT 13.56 MHz HF side - it will be the one use will use your phone ( or others ) to read and POSSIBLY for access, Work / home door etc.
The xEM 125 kHz LF side - will be the one you PROBABLY use for access, Work / home and projects etc.
Consider - How and where you will use this! ( The example I have given before was, if you are Right-handed like 90% of people and drive on the Right-hand side of the road like 66% of the world population, I would recommend the NExt into left hand - because your phone in the right hand ![]() to scan the left hand, If you sit on left side of car to reach out window for work garage door swipe systems, barrier arms etc…)
to scan the left hand, If you sit on left side of car to reach out window for work garage door swipe systems, barrier arms etc…)
IF you put your SPARK 2 in your left hand also, you will likely get crosstalk / confliction (they are the same frequency 13.56MHz, so when trying to read one it may read the other ![]() ) SO I would suggest you put the SPARK 2 in the opposite hand, Right in this scenario.
) SO I would suggest you put the SPARK 2 in the opposite hand, Right in this scenario.
The xLED is also the same frequency as the Spark 2 and xNT (13.56MHz), however, you MAY / PROBABLY want it to energise / light up when you scan, either your NExT or SPARK 2, so now you have 3 choices:-
And this depends on when you want to “LIGHT IT UP”
Put it next to NExT ![]() ( give at least 5 mm spacing between implants )
( give at least 5 mm spacing between implants )
Put it next to SPARK 2 ![]() ( give at least 5 mm spacing between implants )
( give at least 5 mm spacing between implants )
Put it somewhere else ![]() ( there are many places, some more practical than others )
( there are many places, some more practical than others )
The choice is, of course, YOURS, and these are just MY suggestions.
-
As mentioned above you need to be aware of CROSS TALK where to devices of the same frequency cause a conflict ( actually tries to read the “Wrong” device ) when trying to be read.
-
Implants should be AT LEAST 5mm apart, to reduce the chance of Cross Talk and also breakage if they were to impact against each other
.
HOW DO I GET IT IMPLANTED
Here is a VERY informative FAQ about x-Series implants, some of which is covered below. But it is recommend you read these FAQs.
There are piercing partners but if there is none near you any body piercer should be able to implant this for you.
A doctor, nurse or medic would be able to but they will likely take more convincing…
A self or assisted install is possible,
The following links that will make this very clear that it is easy to do
Watch Installation procedure Guide 1
Watch Installation Procedure Guide 2
Watch Needle insertion angle
How to approach a professional DT Info
After Care
As long as you have used good aseptic techniques during the installation process, the healing should take care of its self with minimal maintenance.
x-Series a simple hydrocolloid plaster for the first 48hrs or so, then leave it open to heal naturally; adhering to standard hygiene practices ![]()
Flex Should be very similar to the x-Series, if using the Dangerous Things 4G piercing needle and steristrips however, the plaster should be left on longer, and further considerations if stitches/ sutures were used.
Post installation, the body will begin to encapsulate the tag with fibrous collagen tissue. To help this process along, you can take pre-natal vitamins, which has collagen and keratin boosting properties helping build collagen and connective tissues.
Also a little common sense wouldn’t go astray…
no weight lifting ![]() /rock climbing
/rock climbing ![]() /shooting
/shooting ![]() /superhero-ing
/superhero-ing ![]()
.
HOW DO I USE MY IMPLANT
So now you want to use your implant!
ENROLL
Often the easiest way to use an implant is to enroll it directly into the system. ie. door locks, work access etc.
NFC implants ( including Vivokey ) can be used directly onto most compatible modern phones
CLONE
The programming / cloning of your implant.
This is going to depend on your access system.
CLONE lf 125kHz
Your Own Access System
xEM or NExT have changeable Unique IDs ( UID )
Clone/ Emulate ( copy work badge, door access etc. )
There are some simple “cheap” solutions
Blue Cloner
DT Cloner ( Watch this space )
DT Cloning Service ( Needs to be done prior to install )
There is a more complicated potentially “expensive” solution
Proxmark3 RDV4 Option 1, Option 2
A good idea before writing to your implant is to practice write onto a test card
You can get a really good test card pack from KSEC which covers all the implant options from the DT store
CLONE hf
ACCESS
Ask the people that manage your access system to enroll or be bribed to enroll your implant into the system ( If they do, then you are all done)
If not, and if your system is compatible then the only HF implant option currently capable of changing its UID is xM1
PHONE
An NFC capable phone is the most convenient ( Easiest )
COMPUTER
ARDUINO
DOOR LOCKS
- Carbine CEL
- Watch this space for a community driven Open Source Deadbolt Lock
There are more examples, just search this forum